Here are some of the ways I have eco-modded (improve efficiency) my IDI van to get better MPG. And, some ideas I might do in the future…
With all of my eco-mods, I average about 20mpg on conventional Diesel fuel, which is astounding for an Automatic Transmission big-block Diesel from the 80’s. If I can keep it at 55mph, I can exceed 20mpg depending on the terrain. The most important eco-mod is driving slowly, but that’s no fun, so here’s how I tinkered some extra MPG’s out of my van:
 Added an Auxiliary Overdrive.
My van has the “bullet-proof” C6 tranny. While it’s a sturdy beast, it only has 3 speeds and it whines like a baby when I’m driving 65 MPH. So after a lot of internet searching, I found a Gearvendor auxiliary overdrive on car-parts.com from a junkyard in Idaho. These units are complicated and buying them used means ensuring several parts are included (read this for more info), but once installed on the end of the transmission, it allows for a 4th gear for the C6 tranny. This reduces the RPM’s to keep the van up to highway speeds, thus lessening the required fuel to drive the vehicle overall.
Swapped out the Rear Axle.
This may be the biggest way to improve MPG on these old IDI’s: Installing a more efficient rear axle. Many of these old vans came with a 4.10 rear axle ratio. While this is an outstanding axle for towing, hauling, and other heavy duty projects, it means some very high RPM’s at highway speeds. If you spend most of your time commuting, road-tripping, or high-end driving, swapping the 4.10 for a lower ratio like 3.55 is highly recommended.
When I did this, I originally investigated prices for a transmission shop to swap out the gears in my rear axle. The estimate came out to $1000, which I thought was outrageous. After a few months, it dawned on my that I could easily just swap out the whole existing rear axle from a different E350, which had the 3.55’s in them. Junkyards have these axles for reasonable prices, and aside from a standard lube change, they are pretty easy to maintain.
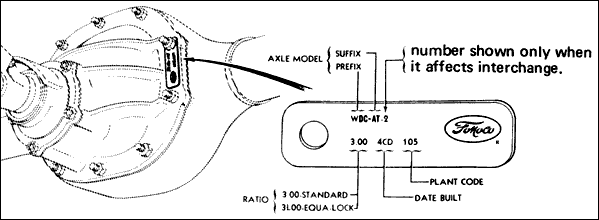
Ford Axle Code Identification
When hunting for an axle, you can identify it with the axle code on the sticker in the driver’s door of the van. But let’s say the sticker is gone or you have a loosey axle not connected to the parent vehicle; there should be a metal tag on the pumpkin that has ratio information as well.
Installed a Turbo Kit.
A new turbo can wake up an NA IDI engine. With the same fuel quantity, the turbo compresses more air into the combustion chamber, thus providing more power. While most car-guys use their improved power from a turbo to improve performance, this also can apply for people who want to improve efficiency.
If the driver can resist the urge to have “fun” with their turbo (like excessive acceleration, speeding, etc), that increased air-flow into the chamber means that at standard highway speeds (55-65mph) less Diesel fuel is used. This means overall, compared to the NA model, the driver is getting the same speed maintenance with less fuel, from the compressed oxygen.
However, as I can attest, having a turbo didn’t always result in better efficiency. The NA version of the IDI is kind of a pooch compared to the turbo, and it truly is more fun to drive with a turbo. But if I can resist the lead foot, I do see a few MPG better than when the Clubwagon was an NA IDI. While there are Banks and “factory” turbo kits for these IDI vans, here’s the thread on how I installed my Hypermax turbo:
Hypermax Van Turbo Install for the 7.3 IDI in a 1988 Ford Clubwagon
Install a Better Low-RPM Turbine.
As the previous category explained, installing a turbo kit on an IDI can provide some added benefit to efficiency. The problem with the IDI stock turbo and the few aftermarket turbo kits is they are engineered to force more boost under load at high RPM’s. This would make sense if the driver is using his/her IDI for pulling a boat or trailer or anything else that requires some decent horsepower and torque. As the vehicle begins to strain under the load, the driver increases the fuel supply, which spools up the turbo, and then improves the boost, thus logarithmically improving overall engine power.
This presents a problem for the average IDI hypermiler: how to get the benefit of increased boost without forcing more fuel into the injectors?
The solution is to install a better turbine. Recently I installed the Wicked Wheel 2 turbine (from R&D IDI Performance) in my Hypermax kit. It is a miracle worker. Not only did it spool up faster and provide better high-end boost and lower EGT’s, it more importantly (for MPG) pushes twice as much low-RPM boost into the intake hat. That means I get twice as much air volume with less accelerator. And that equates to more power at hypermiling cruising highway speeds. More power means there is less fuel required to maintain the same road-trip speeds prior to the Wicked Wheel 2 installation.
I’m very impressed with their product and recommend it. Here’s an article and video of the installation of this turbine:
Wicked Wheel 2 Installation on a Hypermax IDI Van Turbo Kit [VIDEO]
Installed a High Efficiency Torque Converter.
Hughes torque converters have a few options, and one is the ability to upgrade the stock C6 TC with an “HD” TC. This TC claims to improve efficiency by 1 or 2 MPG, and after I installed it, I an confirm the company’s assertions. Thankfully due to the doghouse, installing a TC is not that hard of a job, just pulling the driveshaft and tranny, sliding in the TC and reinstalling the tranny. But for an IDI truck, that would be a PITA.
Bought LRR Tires, Obtained the Largest Possible Tire-Size, and Proper Inflation Maintenance.
One of the fastest ways to add 1 or 2 MPG to any vehicle is mounting LRR tires. These are special eco tires that are not common at most parts stores. You may have to order them special and have them mounted by a dedicated “tire shop.” But the difference is amazing. The rubber material and the unique tread pattern is specially designed to reduce road friction.
In recent years, the popularity of LRR tires has increased so they are becoming mainstream. As they improve the efficacy of LRR tires, they also have been improving the performance of the traction in rain and snow. It’s now possible to find a decent pair of LRR treads for all seasons.
Also, by getting the largest size tire you can safely put on your vehicle, it takes less RPM’s to go the same speed, thus using less fuel once up to speed. On my 1988 Clubwagon and this modified suspension, I’m able to run LT235/85R16E1 Michelin LRR tires with the slightest rubbing on the frame when turning completely to the right or left. That’s literally as big as I can get them, before they cause steering and suspension issues.
Synthetic Spindle, U-Joint, and Rotor Bearings Greasing, with Proper Alignment.
Improper alignment and unwanted friction robs HP and MPG. By hitting all my grease-able joints and bearings with high-quality synthetic grease, I eliminate lots of lost energy just trying to keep the van up to speed. Low-quality grease wear out faster, whereas high-quality stuff bonds with the metals providing a long-term protection against wear and tear. And improper alignment forces the tires to connect with the pavement in an odd way, which will cause early wear patterns, but more importantly, cause friction and fuel usage.
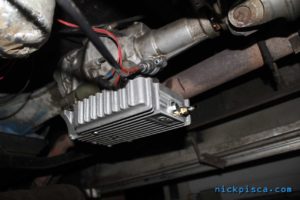
Electronic Pump Conversion and Lift-Pump Delete.
While I doubt the lift pump was putting that much strain and drain on the camshaft, every little bit helps. By converting to a Duralift 7-9psi electronic pump (e-pump), I pull one more thing from causing friction on the drivetrain. Also, the e-pump makes maintenance and bleeding on an IDI much easier, so it has extra benefits.
Stock Diesel Filter Delete and Stage 1 Dual Filter Replacement on the Rail.
The stock filter is notoriously bad at filtering, and also it isn’t rated for high-flow. By investing in a Stage 1 filter setup, you gain the benefit of better filtration and higher flow, which means less strain on the IP. Everyone knows that a clogged filter means more inefficiency and loss of performance, so upgrading to a high-performance dual filter will help a lot.
High-Flow Exhaust Muffler and Wrapped Pipes.
By installing higher flow exhaust, not only does it provide lower EGT’s, but it allows for easier expulsion of exhaust gasses, which leads to slightly better power and economy. I installed a Walker “Straight-Through” muffler which is essentially a glass-pack that lets the gas flow out quickly from the down-pipe and keep the noise to a minimum. Also, with lower EGT’s, the engine runs more efficiently. My Walker exhaust reduced my EGT’s by 300 degrees, which is astounding.
Wrapping the manifolds, turbo-housing, up-, down-, and other exhaust pipes allows for the exhaust to expel the heat out the tailpipe instead of infesting the engine bay, thus reducing overall engine temps and requisite cooling. All this contributes to the efficiency of the overall vehicle.
Photo-voltaic (Solar) Panels on the Roof.
With a proper charge controller, solar panels can top off the batteries on my van as well as provide a source of power throughout the day when I’m parked and camping. This puts less strain on the alternator, which means less energy is wasted through the v-belts.
Replaced the Steel Driveshaft with an Aluminum.
According to American Muscle, an aluminum shaft is 40% lighter and reduces angular momentum for greater acceleration. That is great for power, but it also applies to efficiency; for it takes less energy to rotate the driveshaft mass to get up to speed. Also, due to the wider radius of the cylinder, it counterintuitively is stronger and stiffer than the steel version, meaning a “much more efficient transfer of power to the wheels.”
I converted my van to an alum shaft when I did the Gearvendor install on my C6, and it’s hard to calculate the actual savings, but over time, I sure it paid for itself. The cost of sizing alum driveshaft is about two-times that of the conventional steel, so it’s not that much of an investment.
Biofuel (Biodiesel or WVO) Conversion.
See more at Nick and Glenn’s WVO Travel and Awareness Site.
Briefly, any diesel can be converted to run on biofuel like biodiesel, waste vegetable oil, or waste motor oil. While there is debate on how to best attempt this, I prefer the reliability, durability, and thorough design of the Frybrid-style WVO kit. This involves installing a complete heated biofuel circuit independent of the stock diesel fuel circuits. Depending on the system installed, the vehicle starts and stops on conventional diesel, but for the majority of the duration of the drive, the vehicle runs on the waste product of fryers.
This involves installing the following elements underneath or inside the vehicle:
- Aluminum or plastic fuel tank
- Heated fuel pickup
- Nickel-plated Flat Plate Heat Exchangers
- Heated fuel filter head with insulation
- HOH (hose-on-hose) or TIH (tube-in-hose) heated fuel lines
- 2- or 3-selector valve system
Choice of materials is crucial. Viton materials are necessary because conventional rubber seals and hoses will deteriorate with biofuel. As for metals, Ferrous and copper-based metals are typically distrusted for their susceptibility to react with warm vegetable oil and oxygen, creating polymerization which clogs an engine. Aluminum, stainless steel, nickel-plated and plastics are preferred when sourcing a tank, fittings, and other components.
This is a huge upfront investment for a WVO kit, but since the majority of the fuel usage is a waste product, the user gets to save fuel money while saving the environment. My kits are found on the website mentioned above. With the diesel offset calculation, my van averages around 150 MPdG (miles per diesel gallon).
Projects for the future of my Megavan:
These next things are kind of pie-in-the-sky dreams of mine, but that’s kind of what I said for all the things above. It will never happen until it just happens. So here is the “eco-mod wishlist” for my IDI van:
Intercooler and CAI hood for my Hypermax Kit.
This is something I really want to tackle, but I was saddled with this darn rebuild for my Spring. It will take a crapload of work, because there is almost no room in the van engine bay to do anything. But I have a plan. I’m hoping to run two “D” cross-sectioned tubes in the port that was designed for the NA air filter housing inlet tube, and connect them to an innercooler mounted in front of the AC condenser and above the auxiliary tranny cooler from the E-350. But, that’s a tall order.
In a conversation with Justin at R&D, he wanted to do a project that had the innercooler mounted on top of the engine, and a heat exchanger connected to the grill would pump oil or a liquid back to the heat exchanger. All this would need some major calculations to figure out the best course of action Another idea would be to mount the inner cooler under the van, but the doghouse leaves almost no room to make it happen. Not to mention the proximity to the up- and down-pipes make it really difficult any heat absorption.
Jayro88’s Econoline Front-Air-Dam
Design and Build a Low Front Air Dam.
Jayro88 is the inspiration for this project, because he did this years ago. His design is simple and functional, and exactly what I need to aide the efficiency of this beast.
While it looks counter-intuitive, putting a huge air block in front of the bottom of the bumper will actually improve radiator airflow and air resistance/turbulence that is generally created under a complicated underside. The optimal underside is a completely flat floor-board, but since that’s unachievable, the next best thing is a sturdy front air dam.
Also, it might be nice to find some fender flares and ground effects from a conversion van, to complete the skirt.
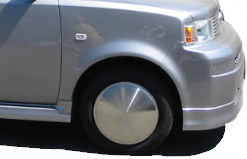
Saucer Eco-Hubcaps
Install Saucer Air-resistance Hubcaps.
These futuristic hubcaps reduce air resistance on the rims of a vehicle. The air glides passed the rim without turbulence or air resistance. I learned about these from a WVO buddy of mine in Los Angeles who went electric. He said to do something first before drilling the rim, and I can’t recall what that is, so do your research.
Electronic Fan Conversion and Fan Clutch Delete.
The fan clutch is notorious for robbing HP and efficiency when it engages. It sounds like a jet engine when the radiator is overheating, because the mechanism inside it lock up, forcing the rotational speed to match the rate of the crankshaft. That’s really fast at high RPM’s. And pushing that air wastes a lot of fuel.
Many guys have been swapping out their fan clutches, shrouds, and fans for the Aerostar e-fan setup, which engages with a typical temperature sensor switch in the coolant circuit. Not only does it reduce the required horsepower to cool an overheating engine, but it takes up less space in the front of the engine bay.
Dual Lead-Acid Battery Delete in favor of Single Lithium Ion Car Battery.
The dual batteries are a huge pain. I never liked them, because when one battery fails, the other “covers” for his buddy, and eventually the both fail and leave you stranded. While researching mods, I found these 20-lb lithium batteries for cars. They are extraordinarily expensive and require an odd charging apparatus, but it would be a valuable weight reduction. Assuming the average IDI battery is 60 lbs, that means a reduction of 100 lbs overall in the front of the van, and freeing up some of the most valuable real estate in the world. I would love to use the passenger side battery bay to install a cool air filter assembly box for my innercooler, but no, it’s currently occupied by a heavy set of lead-acid batteries.

Design by XL Hybrids.
Front Wheel Drive Install with Tesla Electric drive to Make an IDI Hybrid.
Not only would I be making the first IDI Hybrid, but it would double as an IDI biofuel hybrid. The plan is this: Do a 4×4 swap on the van, but not install the transfer case and front driveshaft. At the front axle u-joint, I mount a Tesla motor on the axle, similar to the way XL Hybrids (image to the right) designed it. The electric motor would crank the shaft where the driveshaft would typically do it. I would mount several batteries under the van on the passenger side, but also mount a 2nd monster alternator with a double-speed pulley that actuates when I engage the front wheel drive to provide most of the power. When the electric mode is desired, the driver would flip to “electric” which would put the IDI engine in idle speed and neutral, and the 2nd alternator would make it a de facto hybrid.
