Over the years, I have the good fortune of obtaining two complete van turbo kits: Banks and Hypermax. They are extremely rare to find. While I haven’t seen one in person, I have seen an old ATS van turbo kit online. As stated in the preamble to my Hypermax Van IDI turbo installation article, van kits are rare because they have to fit in the tight space in front of the doghouse and underneath the engine bay ceiling. Truck kits are of no use here because they are too tall. So when shopping for van turbo kits, here is some information that might help you weigh the differences.
- Table of Contents:
- The Banks Van Turbo Kit
- The Hypermax Van Turbo Kit
- The ATS Van Turbo Kit
- R&D IDI Performance’s Van Turbo Kit
- Pros and Cons
The Banks 6.9/7.3 IDI Van Turbo Kit:
The most notable features of the Banks kit are the conjoined y-pipe under the transmission and the air intake filter up on the front of the engine bay. The Y-pipe does limit the kind of transmission you can use with your IDI and also it limits any enhancements you might have done to your tranny, like my van’s aftermarket aluminum ribbed deep sump on the C6.
In the image below, I’m focusing on the rear side of the engine. The CDR is attached to the side of the Air Intake CDR Mount, which is connected with a coupler to the turbo. The turbo pedestal is mounted with sturdy hex-head bolts to the passenger-side cylinder head, whereas the hypermax turbo pedestal has rather flimsy countersunk allen style bolts. Also, the Banks turbo pedestal retainer nuts are much higher quality than the bolts on the hypermax system. The up-pipe conjoins under the tranny, so the pipe is beefier and larger diameter than the hypermax system.
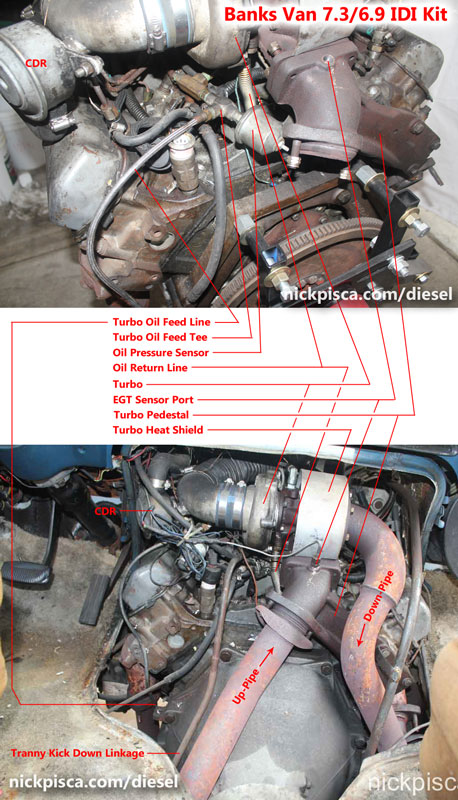
The EGT port hole is located at the outlet side of the pedestal, not on the exhaust manifold or up-pipe like many other kits. This may not be an ideal place to get an accurate measurement of exhaust gas temp. By the time the gas has traversed the up-pipe, it might be significantly colder than when it left the chamber, and with all IDI turbo kits, keeping the EGT’s under 1250 deg F if paramount to prevent cylinder and piston damage.
Another design flaw in the Banks system is the placement of the oil feed line and oil pressure sensor. The oil passage on the back side of the oil cooler assembly is used with a braided metal line up to the top of the intake manifold, where it is “tee’d” to house the oil pressure sensor and line up to the top of the turbo oil inlet. This is a rather convoluted path to get oil up to the turbo.
To Banks’ credit, they did manage to design a kit which preserves the tranny kick-down linkage from the C6 to the IP. Also they use a tranny dipstick tube that does not require the full disassembly of the turbo kit to install it. The Hypermax design required the mechanic to pull off the turbo to install the tube, and even then, it’s really difficult to install. I was never able to get it to work, even after the Hypermax team insisted it was easy to do.
In the front of the engine, the Banks kit has a three-foot long air intake hose to connect to the CDR mount to the air filter bracket. Considering that I’m always tinkering on my IDI, driving it to remote parts of North America, and fixing it on my own if there is a problem, the fact the air intake hose blocked the majority of the injectors and lines from maintenance was the main component why I parted with the Banks Kit and kept the Hypermax kit (Engine-top real estate is a hot commodity in a van, so even a slightly better performing turbo kit gets trumped by a cleaner and more efficiently spaced design).

The CDR hosing routes all the way around the driver’s side valve cover to the front IP gear housing oil fill inlet. Banks provides a new inlet that has a CDR connector bib welded to the side of the fill. Newer IDI’s have the oil fill ON TOP of the gear housing. That probably means for Banks Van Turbo Kits in the later years used the standard Banks kit CDR breather that replaces the stock gear housing front plate. Regardless, I’m not a fan of the snake-like CDR hosing in the Banks design; When you fill up the oil, some trickles into the CDR hose and pools in the low-points of the hosing. Since rubber hose doesn’t take oil well, it weakens the tubing over the years. And since these hoses are “formed” tubing and not just generic hose, it will cost a decent amount of money to find and buy replacements. The Hypermax CDR breather is the simplest and cleanest design; it just pushes releases to a hole in the valve cover.
The banks kit has bolts that hold the up- and down-pipes from separating. The down-pipe is fastened to the turbo housing with six sturdy bolts that also retain the heat shield over the turbine housing. The Banks kit also has an exhaust down-pipe gasket that ensures no gas leakage.
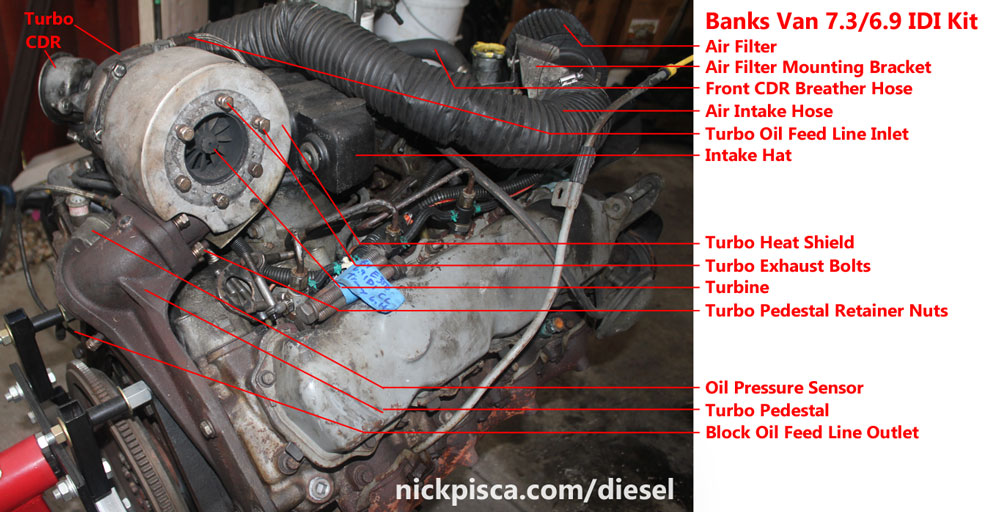
The Banks Intake Hat is really beefy. It has several ports and plugs in the assembly for an innercooler and boost sensors. My Banks IDI kit had all the ports plugged except the air inlet and boost sensor bib. I’m not sure of the aerodynamics of this semi-cylindrical Intake Hat, but considering many Truck IDI guys swear by their respective Banks design, I’d have to assume the designers at Banks chose this for a reason.
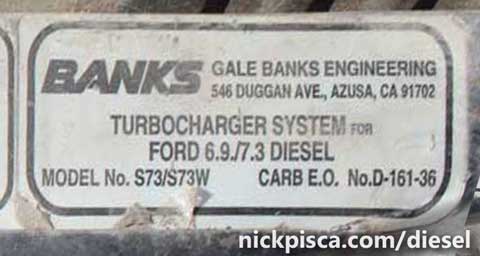
The Banks kit model number is S73/S73W and Carb E.O. Number is D-161-36.

Another thing that annoyed me about the Banks design was the front-mounted air filter housing. The bracket comes with wing nuts so the user can easily move the filter out of the way, but that is still annoying as hell when you want to do simple things like pour in a quart of oil, crack an injector, or time the IP. Also, the 3inch diameter hose can easily deteriorate. The hose I had from the PO of the 1984 van was so damaged and perforated, that I doubt the filter was doing any actual filtering. I’m confident the intake was breathing in unfiltered air, and the hose would require constant inspection just in case one of the components in the engine bay wore a hole in the hose.
That being said, the air filter (assuming it is installed properly and not damaged) does receive clean colder air than the Hypermax. However, the K&N style filter is not very high flow or good at filtering.

Hypermax Van Turbo Kit:
A much better explanation of the details of the Hypermax kit is located here. I’m mainly focusing on the differences of the kits in this article, but if you want a very detailed explanation of the Hypermax kit, check out the full install write-up.
The main features of the Hypermax kit that come to mind are the two up-pipes and roomy design. The Hypermax kit leaves a lot of room to access injectors, the IP, and other parts from the front of the engine bay and the passenger side of the doghouse. For an older vehicle, it is imperative to be able to access these things. The Banks kit blocks all this stuff and makes it a nightmare to work on.
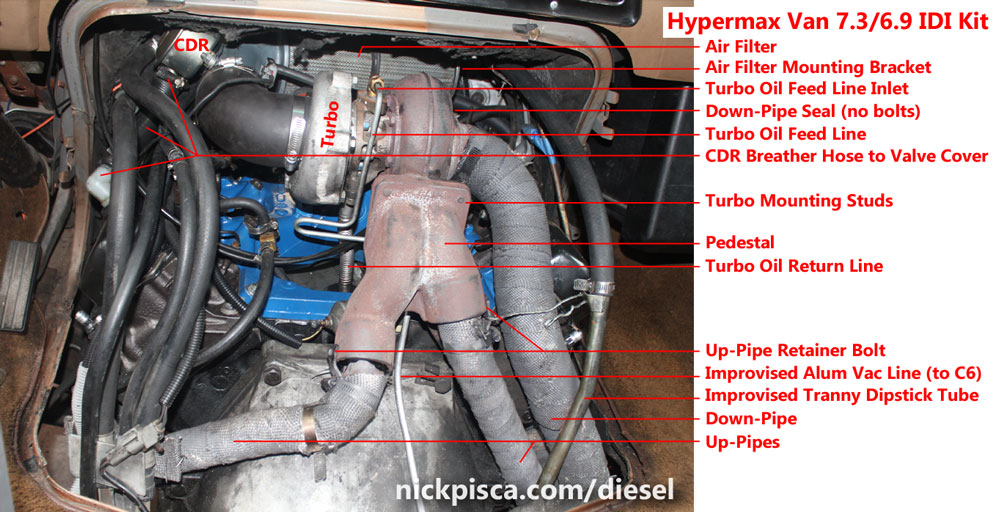
The turbo pedestal is rather sturdy, but it mounts to the cylinder head with countersunk bolts. It’s hard to torque them down and I’m always worried they will wiggle free.
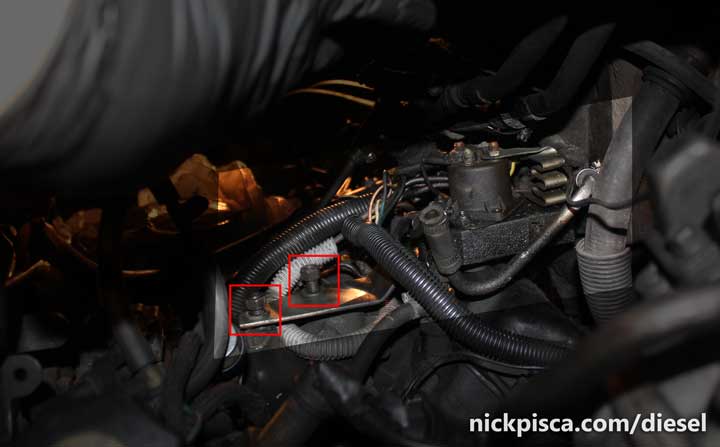
The CDR is mounted in the same place as the Banks Kit, but the hosing is dramatically different. The Hypermax instructions require the owner to drill a hole in the valve cover to vent the crankcase gasses into the CDR hosing. A plastic elbow is situated in a rubber grommet to fasten the CDR hosing. Even though this requires some up-front work, this is a far superior design to the endless serpentine hosing of the Banks kit, because it is just a simple section of rubber hose to the valve cover. (You can see the white elbow in the image above on the driver’s side valve cover, under the heater hoses.)
The Hypermax kit has a shorter and simpler metal turbo oil feed line. It is mounted from the stock oil pressure sensor port, and the sensor uses the same location just oriented away from the hot components. This means there isn’t some long braided line coming from the bottom of the block like the Banks kit.
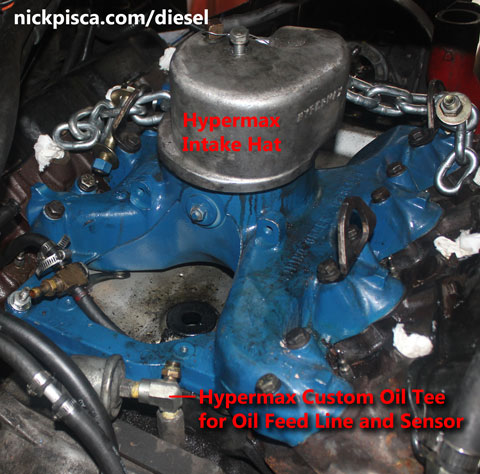
The Hypermax has a smaller Intake Hat. This probably helps to reduce turbo lag, but the main reason why I like it is the size. There isn’t a lot of room in the engine bay so smaller is better. Hypermax provides a tapped hole for the user to install a boost gauge. The only downside to the Hypermax Intake Hat is unlike the Banks Hat, there are no additional ports for an Innercooler or other components.
The Hypermax kit provides an EGT port on the Driver’s Side Up-Pipe, which is closer to the exhaust manifolds, which provides better temperature approximations to the block. The Banks kit is closer to the turbo.
When I bought the Hypermax kit, they insist you revise the GP harness to move the relay to the side of the engine. This moves the plastic harness away from the turbo, which can heat up to over a thousand degrees Fahrenheit. Here is the image of the layout that I chose to do:

The Hypermax kit comes with a metal cantilever plate that moves the relay over the top of the driver’s side valve cover. There is more about this process in this article on IDI Online. This relay location is different than the Banks kit, but I think that is more because the Banks kit came from a 1984 6.9 IDI, and my hypermax was designed to mount on a 1988 7.3 IDI. The relay systems are different between those engines, which means the turbo systems are indirectly different.
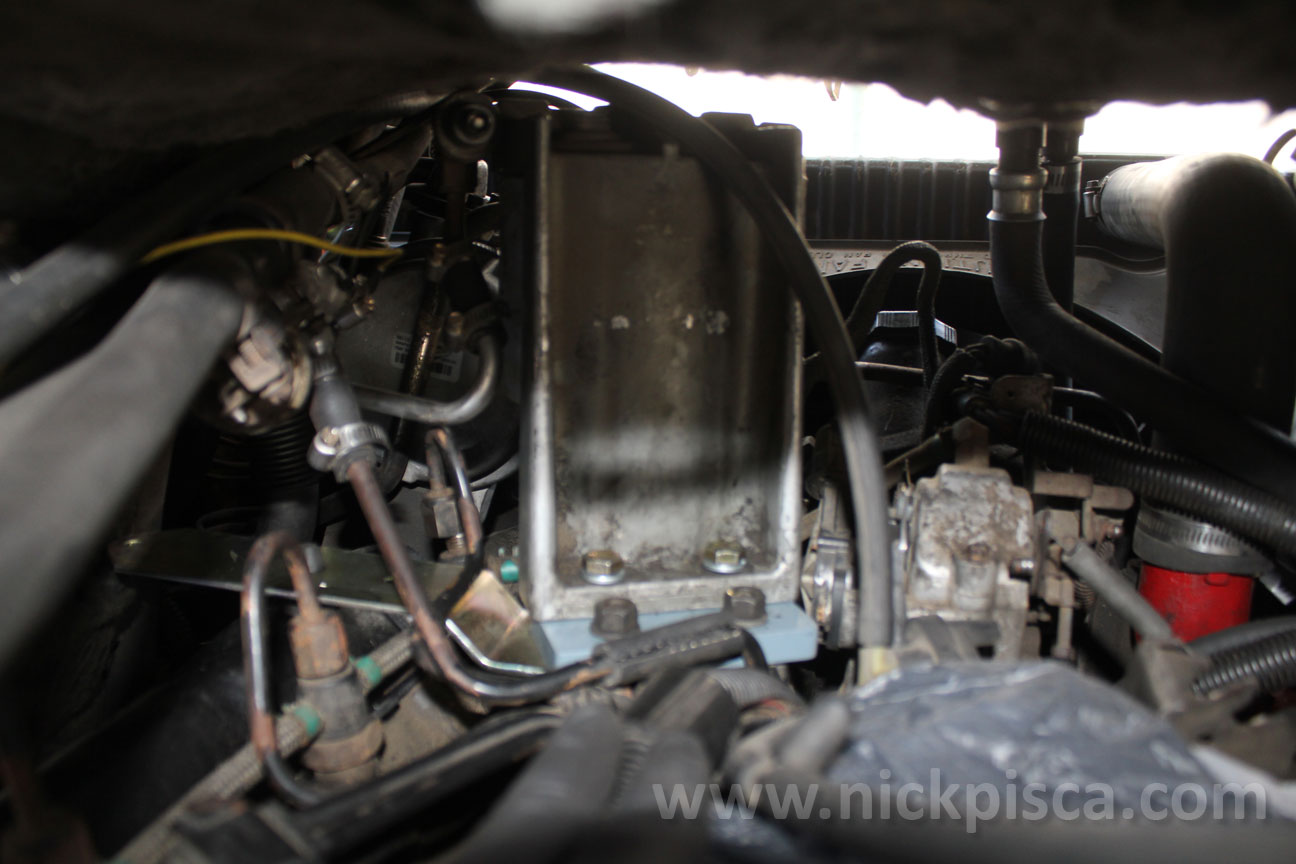
In the image below, I am looking through the doghouse to the front of the vehicle. As you can see, the Hypermax kit leaves the owner with a LOT of room to access all the injectors on the passenger side, and access to the throttle linkage and intake.

The Hypermax Air Filter is rather large. This provides improved air flow in contrast to the Banks system. Also, the filter is just two NAPA Gold 2143 filters glued together with Permatex, which is great because replacements are easily sourced and quite inexpensive.

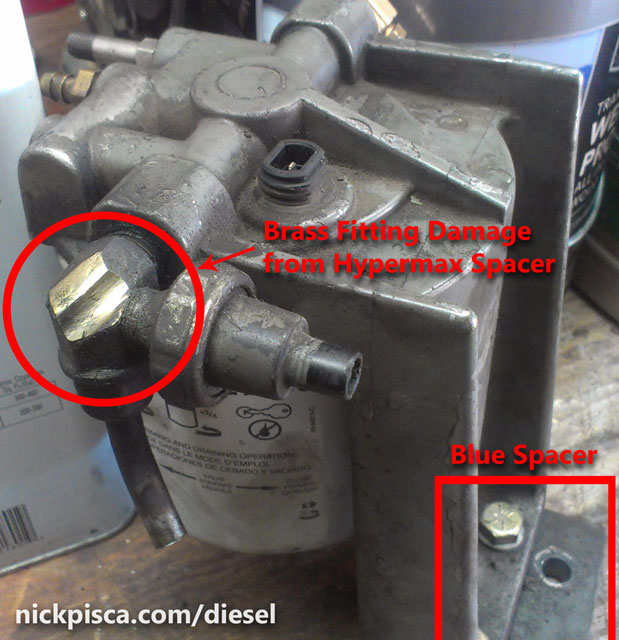
The air filter is nestled in front of the intake hat and behind the IP, so unfortunately, it does not receive a lot of cold fresh air. Hypermax does offer a Cold Air Intake to remedy this, but it is extra cash. Since the filter was so large, to ensure it fits, they provide a blue steel spacer to move the filter housing forward an inch or so.
Unfortunately, for vans that have the rear heater core systems, there are 5/8″ diameter metal coolant lines that run across the top of the engine bay. Those lines, which hide in the wholly insulation on the ceiling are hard to see, and they (if things line up just right) might clash with the slightly elevated diesel filter housing. In the image below, you can see the damage my brass fitting incurred from several thousands of miles of driving with the metal rubbing together. I was extremely fortunate to not have a fuel issue.
ATS Van 6.9 / 7.3 IDI Turbo Kit
Probably the rarest manufactured van turbo kit is the ATS setup for the IDI. Thanks to John Clugston, he shared some photos of a kit he was selling, and gave us permission to post them here.
The obvious differences in the ATS are the oblonged down pipe and square air filter box. In a lot of ways, it is very similar to the Hypermax where the air filter resides atop the engine, instead up front like the Banks.
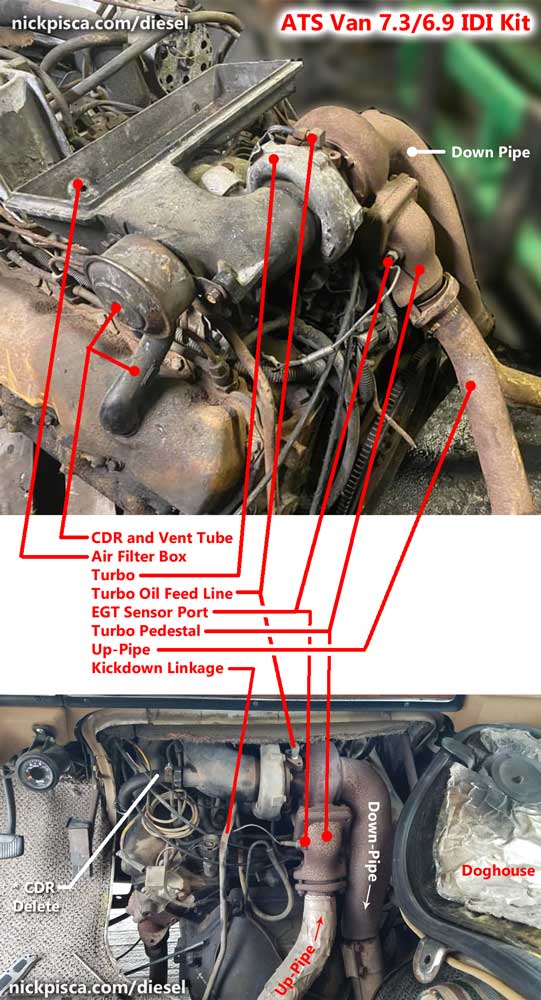
Also, the ATS and Banks use a y-pipe setup around the underside of the transmission, unlike the Hypermax. The ATS situates the CDR on the side of the air tubing, and vents through the driver’s side valve cover.
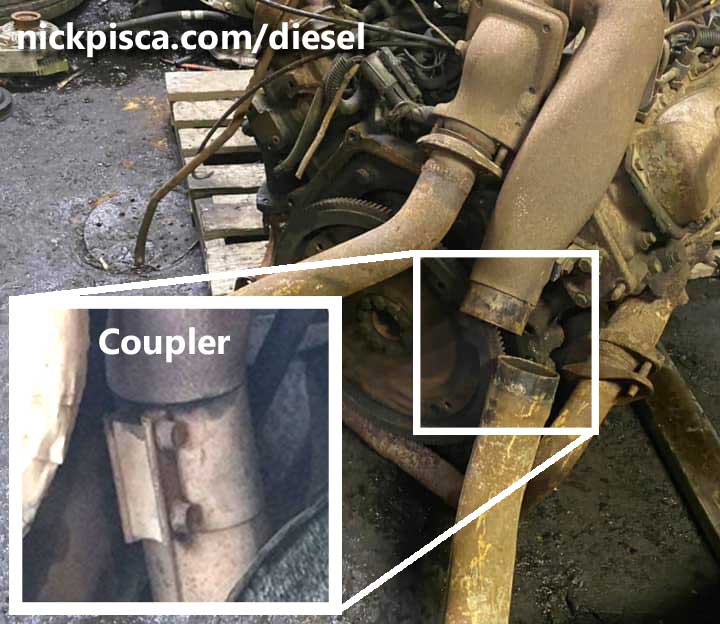 I do like the Torca style exhaust coupler on the ATS, which probably makes disconnect and reconnect of the down pipe easy without leaks or difficulty. The Banks has a bolted setup while the Hypermax has this odd form-fit deal. The ATS likely reduces the likelihood of exhaust leaks. Also, since this mounts further down the down-pipe, it likely allows the mechanic to more easily position the exhaust and down-pipes through the doghouse hole. The Banks and Hypermax down-pipes reach all the way to the turbo outlet, which makes it really hard to fish up from underneath between the transmission and doghouse heat shielding. The deformed shape of the down-pipe also allows for more distance between the doghouse and the kit, keeping the doghouse plastic a bit cooler, but I really doubt an inch or so will make much difference at 1100 deg F.
John surmised that this was an 085 ATS kit. I didn’t have the luxury of seeing this kit in person, so I can’t verify the details of the setup, aside what was in the photos. I was unable to retrieve the air filter information aside from what ATS posts on their website, which doesn’t distinguish between van and truck information. I’ve contacted ATS personally for verification, and I’m waiting for their response. From their site:
Replacement air filters for original 093 system.
K&N= 33-2088, AC= A1288C, FORD= F3TZ9601Z, FRAM= CA7403, NAPA= 6317, PURO= A44853, WIX= 46317
Replacement air filters for original 088 system.
K&N= 33-2015, AC= A1114C, FORD= E6SZ9601B, FRAM= CA5057, NAPA= 6128, PURO= A33593, WIX= 46128
Replacement air filters for original 085 system.
K&N= 33-2004, AC= A175C, FRAM= CA3544, NAPA= 6115, PURO= A34759, WIX= 46115
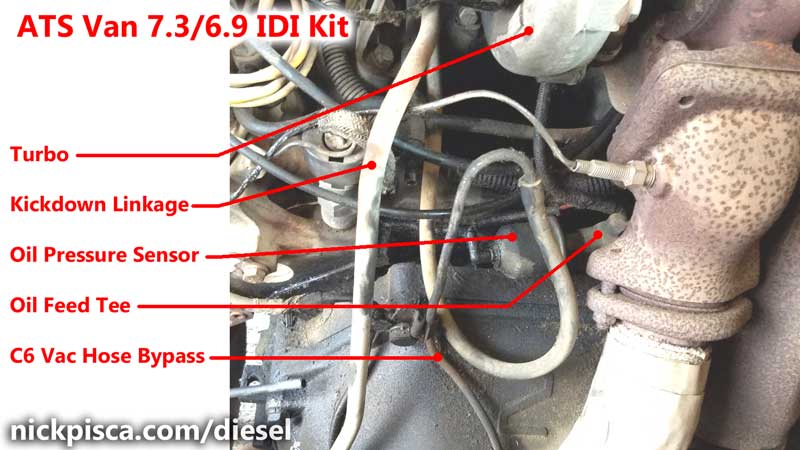
The oil supply comes from the stock oil pressure sender port, much like the Hypermax setup. There is a custom tee that allows the sender to sit cantilevered over the trans adapter. In the photo above, there is an odd C6 vacuum hose bypass that makes a peculiar vertical loop. I doubt this was FAD. While it’s important for all van turbo kits to convert all the vacuum hosing near the pedestal to be metal (as to ensure the vacuum hose doesn’t melt), I’d assume the proper way to plumb the vacuum system would be to limit the amount of bends.
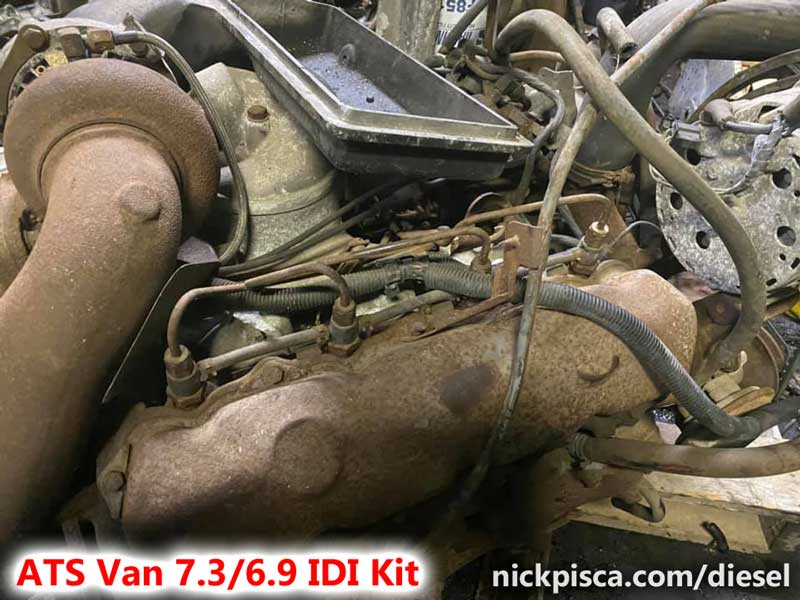
In the image above, you can see the IDI engine on a stand. Normally the engine bay ceiling would be obstructing this vantage point. We get to see the orientation of the intake hat, air filter housing, turbo housing, down-pipe, and the rest of the IDI engine. The difference between Hypermax’s cylinder air filter setup and this ATS air filter housing is, the ATS leaves almost zero room to access injectors, the IP, injector lines, throttle linkage, and other components on top of the intake manifold. This would be prohibitive if you wanted to crack injectors or do other stuff. The hypermax cylinder affords much more room. Also, contrasted to the Banks kit, the ATS air filter is rather close to the intake, and would likely absorb heat from the engine and transmit that to the incoming air temp. Lastly, from this viewpoint, you can see the small amount of heat shielding (mounted to the front-underside of the down-pipe, which must be there to prevent too much heat to be transmitted to the diesel return lines, wiring harness, and to the intake itself.
R&D IDI Performance Van Turbo Kit
As an IDI enthusiast, I try to keep my ear to the ground on the revolutionary new performance and efficiency enhancements to the International Diesels. In September of 2020, R&D IDI Performance built an innercooled turbo kit for a van customer. I’m hoping to get permission to show some of the photos in a blog post about this truly unique and high-performance machine.
Overall Pros and Cons:
Banks Van Turbo Pros:
- Sturdy and simple connectors.
- Exhaust mounting is strong and simple to connect.
- Exhaust up- and down-pipes are bigger
- Air intake filter receives colder air up at the front of the engine bay.
- Preserves the tranny kick-down linkage for the C6 transmission.
- Uses a simpler transmission dipstick tube assembly.
- Slightly higher performing boost capacity (rated to 12psi)
Banks Van Turbo Cons:
- EGT sensor not near the engine manifolds.
- Air intake filter blocks front of engine, making it hard to maintenance.
- Air intake hose blocks the top of the engine.
- Air intake hose deteriorate rapidly and requires constant inspection.
- Air filter is rather small.
- CDR breather has long hosing taking up lots of engine space.
- The CDR gear housing oil fill allows for some oil to infiltrate the hosing, thus causing long-term damage on the inside and constrict flow.
- Singular Y-pipe design limits the type and enhancement of transmission components.
- Turbo Oil Feed Line is long and convoluted. Oil Pressure sensor is tee’d in the middle.
Hypermax Van Turbo Pros:
- Very good access to injectors, linkage, and other engine-top parts.
- Filters are easy and cheap to replace.
- Air filter assembly design is short and simple.
- CDR assembly design is short and simple.
- Shorter and metal oil feed line.
- Oil pressure sensor simple design.
- EGT port is on the driver’s side near the manifolds.
Hypermax Van Turbo Cons:
- Really awful up- and down-pipe pedestal connections (no bolts).
- Small dual up- pipes
- Slightly lower boost capacity (rated to 11psi)
- Air filter is centrally mounted with little access to cold air.
- The pedestal is mounted with flimsy countersunk fasteners.
- Tranny Dipstick tube didn’t work
- Requires using a hole saw on your valve cover.
- Blue fuel filter head space plate forces the housing up into the rear metal heater core lines on the ceiling, thus wearing down the brass fitting to the point of failure. (Only pertinent to vans with rear heating and cooling units)
ATS Van Turbo Pros:
- Nice fat down-pipe to allow for better exhaust flow and lower EGT’s.
- Down-pipe designed with a simple coupler near the doghouse opening, allowing for easier installation/removal.
- Filters are easy and cheap to replace, assuming they match the truck IDI part numbers.
- Air filter assembly design is short and simple.
- CDR assembly design is short and simple.
- Shorter and metal oil feed line.
- Oil pressure sensor simple design.
- Can access the front of the engine bay due to the low-profile centrally-located air filter housing.
ATS Van Turbo Cons:
- Very poor access to injectors, linkage, and other engine-top parts.
- EGT port located on pedestal, not near the exhaust manifold.
- Unknown boost capacity (unable to test)
- Air filter is centrally mounted with little access to cold air.
- Requires a modified or custom valve cover.
- Singular Y-pipe design limits the type and enhancement of transmission components.
- Air filter is rather small. (Could lead to higher EGT’s or poor air filtration)
