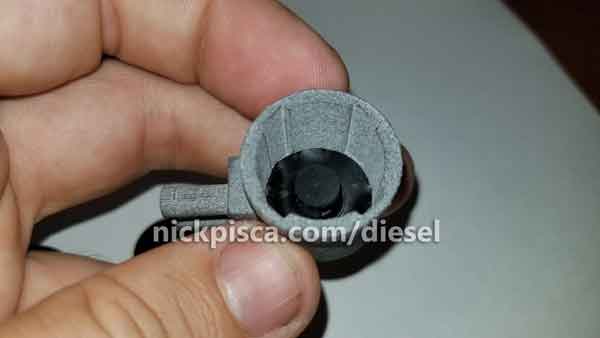
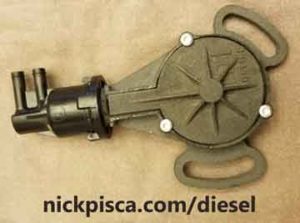
We can rebuild your existing VRV if it is not working or broken.
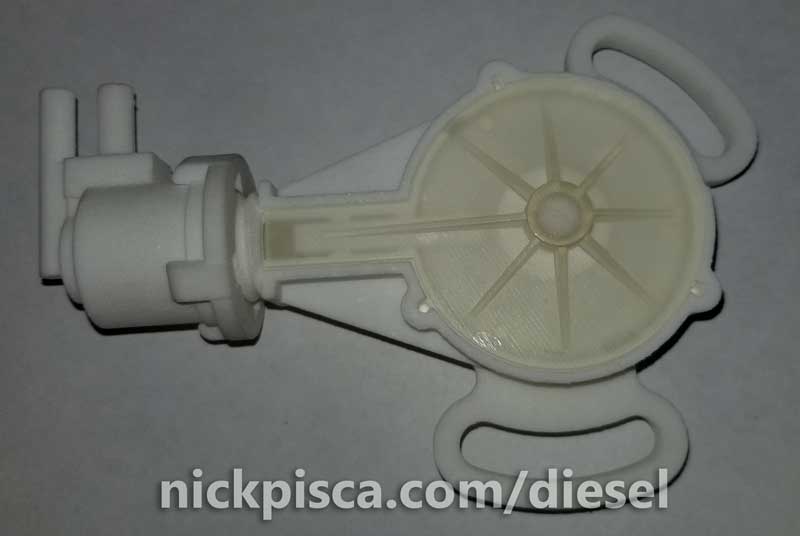
Since the IDI C6 VRV (Vacuum Regulator Valve) was discontinued years ago, they are becoming scarcer and scarcer. We have made a VRV based on the old design for the 6.9 and 7.3 IDI, but with a few enhancements to make the part simpler and easier to maintain. Please click an option below:


(Ford Part Nos. F0TP-7B200-AA, F0TP-7B200-A, E5TP-7B200-AA, E5TA-7B200-A, E7TA-7B200-AA, E7TA-7B200-AB, E7TA-7B200-AC, E8TP-7B200-AA, FOTP-AA or International Part No. 1801361c7)
Brief Summary Video of the Current Progress:
If you are new to my services, please be patient. This is not my day job. I work on the new assemblies in my spare time. I prioritize rebuilding project above all else, but new VRV’s are a side project.
History:
The older VRV is plastic and eventually breaks down. Since there are no replacement parts for sale, this leaves the IDI owner with a tough decision: either replace the transmission with the inferior E4OD or scrap the vehicle. My goal is provide a new VRV that takes the place of the older part.
I’ve been documenting all the work I’ve been putting into this project, so that you know it’s been a royal pain in the ass. LOL. It’s basically a hobby of mine that turned into an obsession, but it’s still a hobby. I appreciate everyone’s support through all of this, and I also appreciate everyone’s patience. Remember, this is not my main job, so if I take a day or two to get back to you, I apologize.

Ultimately, when this is done, I’m going to provide two types of products. First, I have produced an inventory of replacement cams, cam links, covers, and parts for the existing VRV. Next, I’m going to provide finished product VRV’s, that are custom designed by me to eliminate some of the unnecessary components that either wear early, breakdown, or really don’t need to be included on the VRV for the IDI IP. I’m hoping to have functioning prototypes soon, and if all goes well, new IDI-Online VRV’s for sale by the end of summer.
If all goes well, I might develop an aluminum VRV, that should last substantially longer than any plastic part.
I’ll continue to post more information on my progress as things develop. I hope to have the first round of prototypes mailed to me in a few weeks.

Update: 6/14/2018:
I got all the stock parts modeled and prepped. It was a lot of work. I’m pretty happy with the detail I was able to model, including all the weep holes, notches, ports, etc. I was even able to get the housing completely designed in 3D, which was probably the most complex solid-model that I even built.
Using assembly design, I was able to virtually-test the model and its action. Everything pretty much worked out, except the castle nut and cam housing cover. I used the 3D clash detection to make sure everything fit just right, and made adjustments accordingly.

So far so good. After testing various mesh resolutions, I found a good balance of file-size and mesh detail. Checked it in another program before sending the files off for prototyping.
I chose three different types of plastic for the testing phase of this project. I’m going to make these in what-they-call “Professional Plastic.” They claim the nylon plastic is good up to 350 deg F, watertight, tensile strength (up to 6960 psi), and chemically resistant (to oils, greases, allphatic hydrocarbons, and alkalies). Ideally, I need these VRV Parts to be high-temp rated and have good abrasion resistance, but I ordered two other types of plastic that I’m pretty confident won’t work. I’ve done quite a bit of prototyping, and the cheaper plastics won’t hold up in an engine bay. But regardless, I ordered them just to see how they compare to the professional-style plastic prototypes. I’ll post images once they arrive.
If the prototypes work out, I’ll order a bulk shipment and begin the first phase of this VRV project. I’ll set up a store selling replacement parts for the VRV, like new cams, cam-links, housings, etc. Then I’ll work on new diaphragms for the VRV. Also, I’m doing some legwork for finding decent spring replacements. And ultimately, I want to get to work on my custom VRV design.
Update 6/17/18:
I’ve been working with another plastics supplier to figure out an alternative for the diaphragm setup on the stock VRV. We’ve narrowed it down to two types of plastics/resins, and we are developing a strategy to prototype an array of thicknesses to optimized the flexibility where it counts. Also, there are other factors in the prototyping process that make this really difficult to produce; like flexibility, durability, longevity, and rigidity. The sales rep and engineer at my supplier have been instrumental in making sure I can model up something that will suit my needs for the VRV.
I’ll keep on moving forward. This diaphragm resin is pretty expensive (along with the other prototype plastics), but I’m willing to make the investment to make sure I get a diaphragm that is the precise thickness to ensure 5 in-hg to 13 in-hg as per the service manual specifications.
Onward.
Update 6/19/18:
The first round of diaphragm 3D models got approved, so I progressed with modeling an array of various dimension and shape diaphragms for prototyping.

Also, I’m still debating on how to connect the diaphragm to the camlink. I’m testing springs and different elastic plastics. I’ve been talking to a large spring manufacturer in the hopes they have something VERY similar to the stock spring already exists in their inventory. Maybe with a bulk purchase, I can make this assembly somewhat affordable.
With the latest prototyping processes, I can make pretty much any amalgamation I can think of. So to simplify the whole component, I’d like to explore concepts that reduce the overall count of parts in the VRV. Less parts usually means less possibility for failure.
Once I get more of the prototypes, I’ll learn more of capabilities of the plastics, and then I’ll keep progressing on IDI-Online version of the VRV.
Update:
The latest set of prototypes is “in production.” I snapped some photos of the facility’s mesh reading software….

Looking good! They estimate delivery of the rigid plastic prototypes around June 29.
Still no word back from the diaphragm plastic cost estimates yet. Their facility is a little smaller so I’m cutting them some slack. I run my own business and know how hard it can be to keep a balance of work-and-life. I’m hoping for the estimates any day now.
Onward!
Update 6/20/18:
Some bad news. The diaphragm 3D model didn’t pass the more advanced examination. Something about the connection material was too small for the resolution of the printer. I’m not really sure how to resolve this yet, I’m brainstorming a new solution. I don’t have a lot of options, because the diaphragm diameter is really small, so extending it will mean creating a larger footprint, thus reducing the flexing capacity of the diaphragm plastic. Back to the drawing board.
As for the spring manufacturers, I’ve been going back and forth on that whole ordeal. We have tried to get some early cost estimation, but since the springs are so odd, they don’t have a good number yet. I’m currently at the point of modeling up the current springs and producing some drawings to aide their bidding.
Some set backs, but I’m going to keep moving forward. The first quote for the springs came out to $400-500 per spring. LOL.
I’ve been trying to make sure that all my products are American Made. So I’m shopping around for more spring manufacturers anywhere in the 50 states. Any suggestions, leave a comment below.
Update 6/22/18
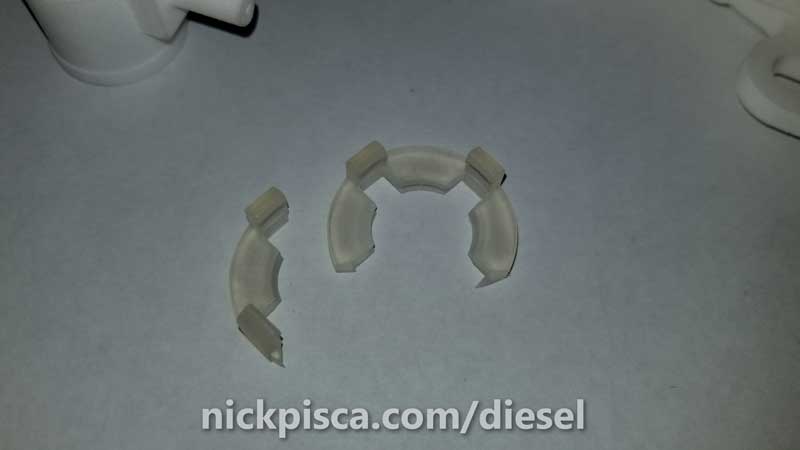
I’ve made the latest revisions to the diaphragm prototypes and sent them off for approvals. I have four different designs (2-way flat disc, 4-way flat disc, 2-way domed-disc, and wide slot flat disc). I’m still confounded on why the last two prototype meshes were rejected, and their explanation was really enigmatic. If they reject this latest design, then I’m going to have to talk directly with their production team, because the sales staff is giving me the run around. Also, I might have to move toward building my own metal mold and pouring my own diaphragm plastics/resins…. Until then here are some pictures:
Update 7/4/18
The first round of prototype plastics arrived!
I’ll start testing the plastics for their longevity, durability, etc.
Update July 20, 2018
Got the diaphragm prototypes. Lots of issues. Those parts will require a full redesign, with the orientations revised.
Update August 3, 2018:
I’ve done an early assessment of the prototypes, and there are issues. I need to revise the 3D models and send out for a 2nd batch of plastics to make sure the proper tolerances are met. Some of the 3D printers must have varying printing tolerances that are affecting the sizing of these meshes, but overall, I’m pretty pleased with the output. Maybe a less fastidious designer would accept the models as is, but I want to make sure they fit together perfectly, and that means more prototyping. I’m quite sure this means I won’t have anything ready for sale by the end of August, but Autumn 2018 is definitely in play.

The first round of plastics were considered “Professional” plastics, with supposedly quite good heat, vibration, and tensile resistant properties. If the product ever went up for sale, I would insist I use this material, because structurally, it is supposedly the best of all the printable plastics I could find. The only downside to this material is the graininess. The material comes in grey and black, and in the future, I’ll just stick with the black. The grey looks really speckled and odd. I’m not really impressed with that variation.
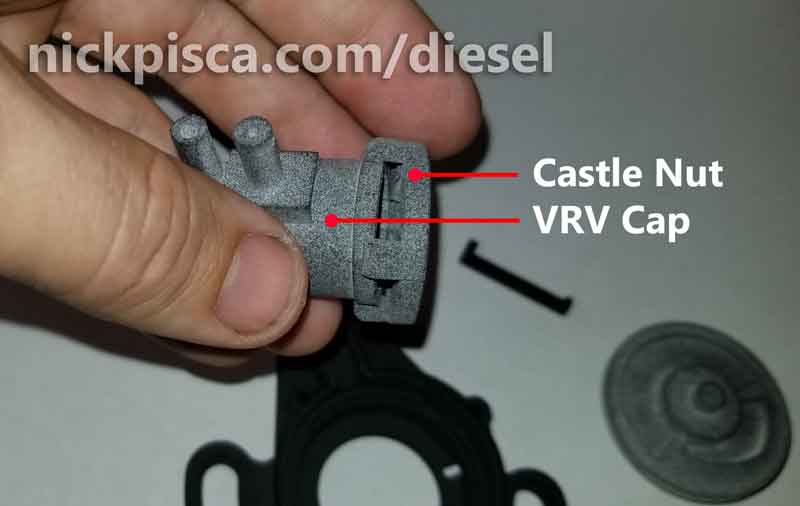
With respect to mating tolerances, the castle nut and VRV Cap models appeared to have printed perfectly, thus allowing for a great fitting.
With the castle+cap combined, the top housing threaded on with ease. One issue here was the tolerance on the threads. It made the cap wobble a bit, but knowing my stock VRV, the cap wobbles on that too. I think I’ll adjust the 3D offset tolerance on that in my parametric 3D model when I send for the second round of prototypes.

Unfortunately, the cam seems slightly off with this particular printed plastic. I would like that to fit a little better and more snug, rather than the slop that is visually apparent in the previous photo.
Also, the Cam Cover fit well, but it appeared to be too thick. Or maybe the receiving-groove in the main housing wasn’t deep enough. Regardless, if I revise that, the top surfaces would be slightly more flush. Not a big deal, just had to mark down in my notes for revising the 3D Parametric model.
The second type of plastic I tested was the white “processed” plastic. This too had a good deal of graininess that I really didn’t want to see. I’m worried this kind of abrasiveness would inhibit good cam and cam-link movement and possibly induce premature wear on the system. I don’t know until I conduct extensive materials testing.
At least with the processed plastic type, the tolerances seemed to fit better. The cam sizing was perfect, so that wouldn’t require any additional prototyping remodeling. Also, the rotation of the cam with the cam-link was smoother. I guess with proper lubrication, the abrasiveness of the printed plastics might not be an issue. In fact, it might help the grease cling to the pockets in the plastic, thus allowing for a better lubricity and retention of parts. Just speculation at this point. I’m still hesitant to lube this up until I get better diaphragm prototypes (see below) and some company to accept my drawings for spring production.

With the white plastic, the cam-link BARELY fit in the housing grooves. The black plastic was actually QUITE sloppy, so that’s one of the differences with the two plastic printing types. The tolerances might be off by as much as 1/64″ which is kind of unacceptable. I need this to be good down to at least 0.005″ if this is going to reproduceable and viable for sales.

Just like the black and grey castle-cap assy, the white parts fit perfectly and snuggly spun. Also, the white cap fit on the cruciform of the main housing snuggly, so it didn’t wobble. I liked it a lot better. No need to adjust the threads on this plastic.
Sadly, the white VRV cap didn’t have a proper vacuum port. The plastic must have gotten stuck in the hole when they pulled it from the bed. Bummer. Looks like Professional Plastic is the only way to go for the cap.
I also invested in the cheaper clear plastic as well. It appears to be far superior to the other two plastics in terms of smoothness. It is really spiffy, but it doesn’t have much for heat and strength resistance. I gave it a shot anyway just to try it out.

One thing that was kind of cool was the ability to see the cam and cam-link thru the transparent plastic.
Sadly, as I was simply trying to push the clear plastic castle on the cap, it broke rather easily. I basically handled this part for less than 5 seconds before it broke. I think this confirms that the clear plastic cannot be trusted on this project.
My diaphragm connector testing went well. The closest plastic to match the elasticity of the stock spring is the second and third shaft, but I need to freeze these and try the materials testing all over again. If the temp affects the elasticity, then I’ll have to find a different solution.
Well, the diaphragm prototypes were all basically a bust. They all had some kind of odd dimpling that was a result of the flexible printing process. Bummer. I talked to the manufacturing staff and we think we might have a solution. I hate to have to send out for another batch cuz they are just so darn expensive, but if I remodel it, I think we can make it work.
Even with the dimpling though, I was able to install one of the thicker test diaphragms and see if it held against the vacuum pump. IT DID! That was pretty cool. Now I just need to get the second round of flexible plastic prototypes and reinsert them into the plastic VRV cap and calibrate if for 5-7 in-hg. Almost there!
Lots more to go, but seeing the light at the end of the tunnel here. If I can get my suppliers to reign in the tolerance issues, and get my models refined, this could be a good Autumn.
Update 10/14/18:
I’ve been remodeling the 3D Model to compensate for the different tolerances for each plastic type. Due to the parametric modeling, it’s slower than typical modeling, but it will allow me to adjust the tolerances with a simple click of a parameter.
The latest round of prototypes have allowed me to figure out the proper diaphragm orientation to remove the stipulation from the mating surface. Now I need to improve the cap housing 3D model to adjust the interior routing of the channels. Sadly, the channels do not always come back from the supplier with a clear tube. Either I need to increase the tubing radius (that would exceed the design spec), or I have to post-drill these caps one-at-a-time on my press. Ideally, I want to eliminate any human postprocessing when I get these from the supplier, but it’s looking like I have to consider that option if I want these made for a reasonable sale price. If in the end, I order a thousand of these, maybe it wouldn’t be the worst thing to post-drill these in a premade jig in a day or so. I don’t know. Just a little discouraged by the claims of these suppliers and their quality assurance/quality control.
I’ll keep on working on these designs.
Update 2/27/19:
I obtained another VRV that had a busted nozzle. Since the unit is broken, I don’t feel to bad about cannibalizing it for research purposes.

I tore down the diaphragm and carefully measured and tracked everything. Now I have a solid understanding on how the pressure regulation is conducted. I’m not too thrilled about their solution, and I’m confident that I can make something that does all this without all the parts. I think 3D printing will open up avenues for regulating pressure that weren’t available when they first designed this VRV.

This VRV had a “cap cover,” which I hadn’t seen on any of my VRV’s in the past. I’ll model this up in the future and include it in my inventory. It appears to have protected the VRV cap well, so I would recommend keeping yours if you have one.
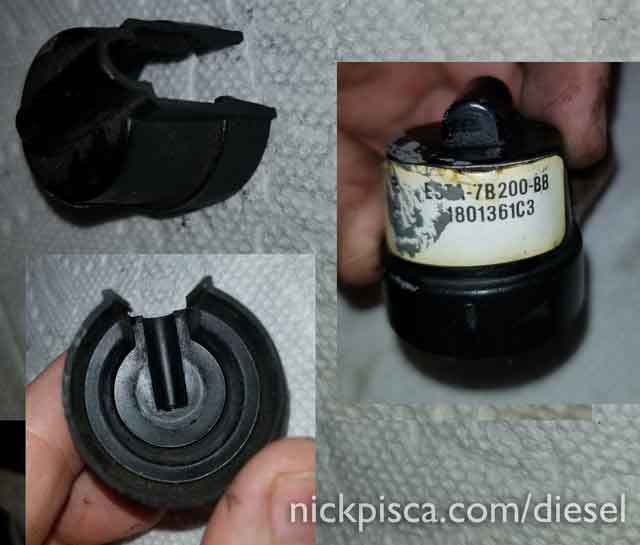
VRV “Cap Cover.” Part Number: E5TA-7B200-BB 1801361C3
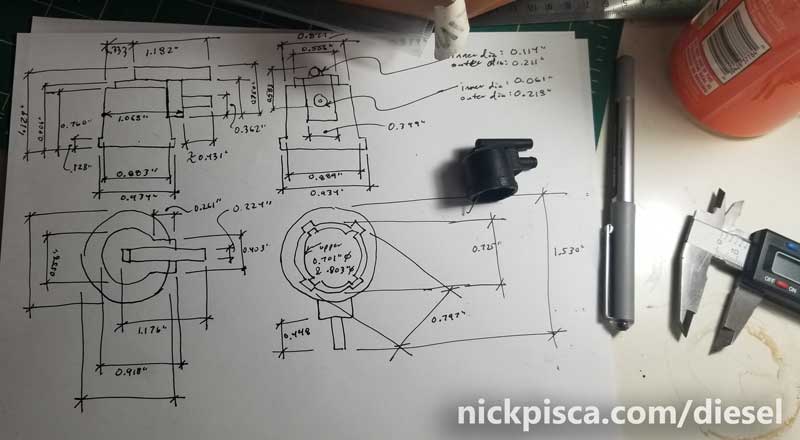
Using the cannibalized VRV Cap, I was able to measure every part down to three-to-five thousandths of an inch, and 3D model the whole cap assembly with the diaphragm.

It’s a rather convoluted design. There is a coil spring that retains the “rod” that opens and closes the vacuum pressure valve in the cap.
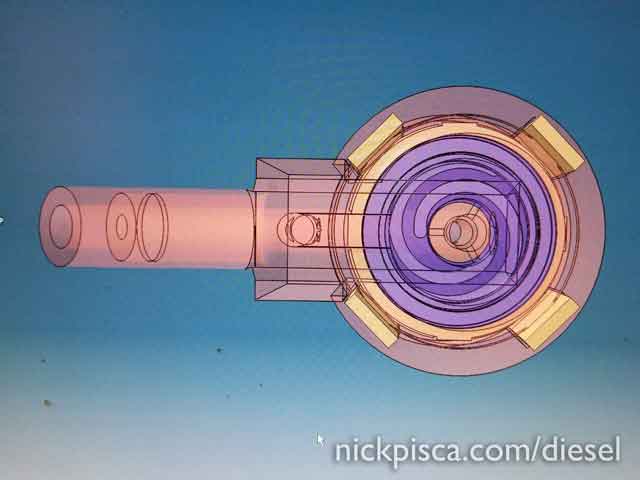
Also, the rod has two flanges that secure its place in the center of the diaphragm.

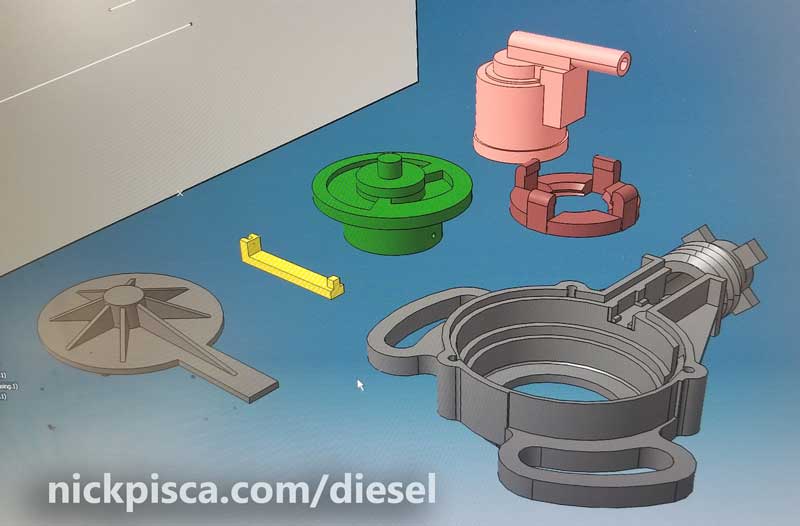
I’m not sure why the diaphragm, coil spring, extension spring, and retainer are all necessary. Seems like three layers of moving the diaphragm when all you need is one. Regardless, I finally have a COMPLETE VRV model:
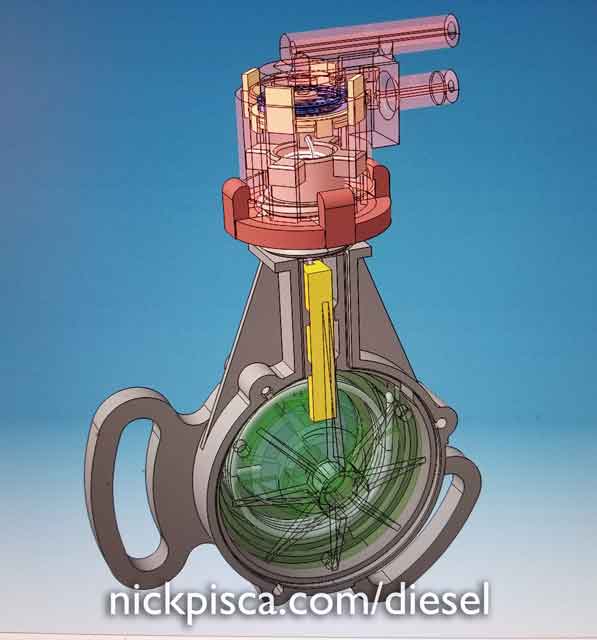
For something that fits in the palm of a hand, this thing has a lot of parts. I digitally modeled the springs as well, and inserted them in the assembly.

In the image below, you can see how the whole assembly connects from the top of the cam-link, through the extension spring, through the bottom holes in the valve rod, through the coil spring retainer assembly, and into the cap hole in the center of the top.

I’m going to send off for more prototypes with this new and enhanced cap 3D model. Also, I’m going to try and do some metal prototypes for the coil spring in the VRV cap, but I’m not expecting much. The coil spring was only 0.009″ thick, and that was hardened steel or iron. I don’t think anything printed in metal can be done that thin, and even if they can, I doubt it could endure the metal fatigue that is likely from constant use on an IDI IP.
I’m glad I tore down this VRV Cap, even though I broke it for good. I learned a lot, and it just confirmed that I want to develop my own VRV cap design that doesn’t use all the internal components. My next goals are: 1.) build an inventory of VRV Cap parts for people that want to keep their older style VRV, 2.) build a custom VRV cap that uses new tech to make something less convoluted, 3.) design the new VRV cap to be backward compatible with old VRV housings, and 4.) do enough materials testing to verify it outputs the proper vacuum pressure at the right rotation of the IP throttle.
Update 3/2/2019:
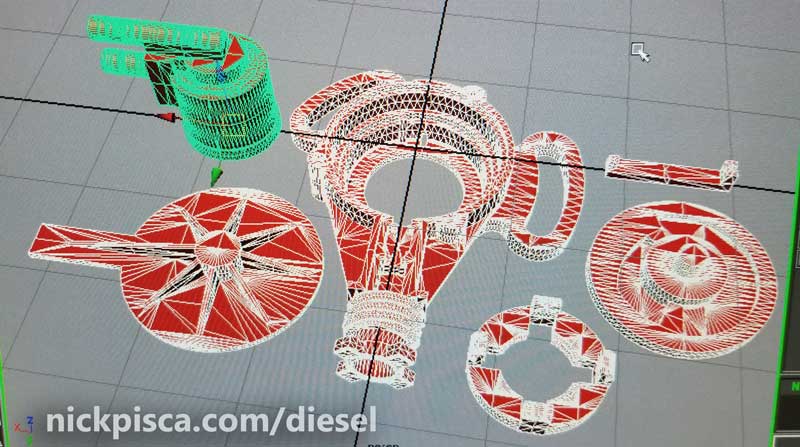
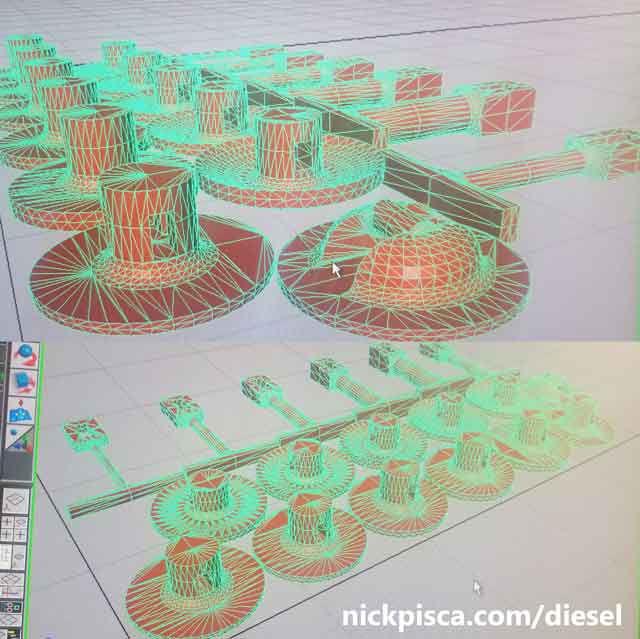
I’ve finished optimizing the meshes for prototyping.
While I was exporting the meshes and verifying their units for prototyping, I decided to use the 3D modeler’s sectioning tool to see how the assembly works. This image really captures the assembly, and how the cam pulls the cam-link, which tugs on the long spring, which retracts the diaphragm rod, which pulls the diaphragm from the under-ceiling of the cap. The flat spring acts as a protector so that the diaphragm doesn’t completely pull out from the cap underceiling. Image below:
I finally got all the geometry sent to the prototyper and some had some geometry issues. I tried to clean them up as much as possible, but we won’t see until they arrive. This will be the first time I’ve tried to print metal for the diaphragm rod and flat spring assembly, so this is a truly interesting experiment.
The brass prints are colored gold in the supplier’s renderer.
There is still some more optimization that I can do to combine geometry to reduce redundancy and minimum prototyping costs, but I’ll wait to see how these turn out first. I don’t want to print a hundred of these diaphragm rods just to find out they don’t fit the spec. Regardless, I decided to combine prints on this test to 8 diaphragm rods and one flat spring assembly, since it would cost me the same to print one anyway. If they happen to fall into the spec, then I got extra. If not, it wouldn’t cost me any different. Model:
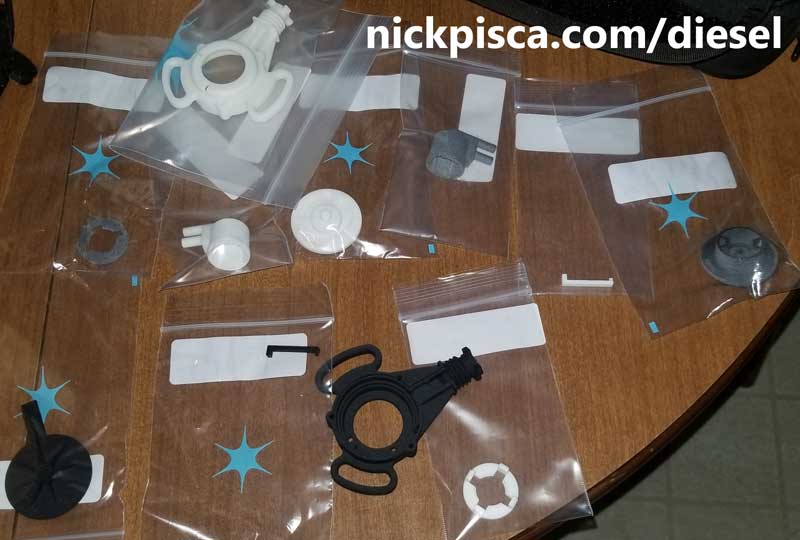
I also added some branding to some of the models. I’ve been getting broken and damaged VRV’s from clients, and I notice that all of them have different part numbers from different manufacturers. I figure I should have some identifying characteristics on my replacement parts so that people know where they came from.

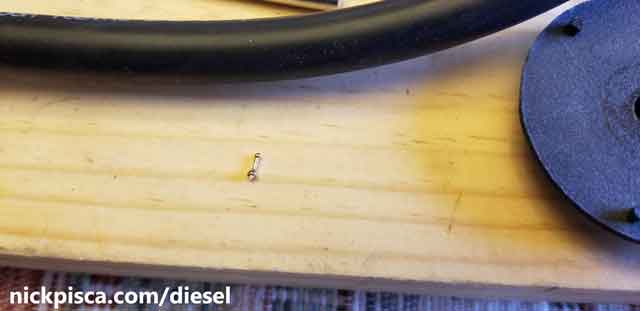
Click to enlarge image. Looking for this exact screw. If you know a supplier, make a comment below.
The supplier said I won’t get this round until the end of March. I have a month to find more suppliers for the springs and bolts. Fastenal, Grainger, and McMaster don’t have the required bolts for this beast. It’s like pulling teeth finding this seemingly innocuous screw. I don’t want to go with an alternative (like an allen screw or torx screw), but it’s beginning to look impossible to find a 3/16″ hex head screw with a flange. If you know a small screw supplier, post a note in the comments.
Planned modifications for the fifth round of prototypes:
- Add fillets to the flat spring assembly and fill in the gaps on the compressed portion.
- Add threading to the bolt holes that matches whatever screws I can find from suppliers.
- Verify the flexibility of the prototyped flat spring and if 0.009″ is printable.
- Find the optimal layout for grouping the smaller components, notably the cam-link, castle nut, diaphragm rod, and flat spring.
- Reinforce the cap ports to compensate for prototyping deficiencies
- Remodel the diaphragm to orient in a way to prevent dimpling.
Update 3/12/19:
I just got off the phone with a spring manufacturer that is compiling a reasonable quote. We’ll finish discussions tomorrow. This could be a big relief.
Also, I found another manufacturer that is going to provide an improved diaphragm plastic. We are working on another round of prototypes and thicknesses. We worked together on how to limit the dimpling on the surface so that it doesn’t release any of the vacuum pressure at WOT. No fancy images to show on this update. It was mainly just phone calls and boring stuff.
Update 3/19/19 and 3/21/19
Huge news!!! Negotiations are complete for both spring orders, and I’ll be getting a few hundred replacement springs to improve my inventory. This would be huge, because there are no VRV springs out on the market today. Big thank you to James Rooks for suggesting Northwest Spring. They had great customer service and really went out of their way to work out a reasonable deal.
VRV Vacuum Nozzle Connector
Also, I am adding some more VRV-related items to my inventory. I’m currently modeling up the VRV vacuum hose adapter, that connects to the cap nozzle. I figure while I’m making all this stuff, I might as well add anything else that is plastic/rubber in the IP area. I’ll post some pictures in a little bit.
I’ve also modeled up the elbow connectors that attach to the nozzle connector. Since these are basic vacuum tubing accessories, the elbows are not really that special or unique. However, they do fit perfectly in the vacuum connector, so I figured why not model it up. I’ve sent out for more prototypes of these new accessories which should be returned by April 20th.
I got a notification that my 5th round of prototypes has been shipped and should be at my door any day now. That would contain the latest metal objects in the cap. I’m very curious to see if the metal is compatible to the VRV setup. It’s supposed to be reasonably strong, and considering theses VRV’s are not loadbearing, I think it should work out fine. I’m curious to see how these crimp or bend too. I wonder if they are brittle. I did get a message from my supplier that some of the metal components were just too thin to print with steel, and they wouldn’t survive the manufacturing process. I’m kind of in a rut there. Haven’t figured out a solution to that yet. It might be something that I literally have to machine in my shop.
Also, I’m working with a shop here in Los Angeles that can lasercut a portion of the assembly for me at a reasonable cost. There is a portion of the VRV that is so thin, that it cannot survive the extraction process when it is produced. I’m hoping the laser version will not only work, but be cheaper if the prototyping method had actually functioned as specified.
I’m contemplating modeling an entire VRV cap or partial cap containing metal to resist against nozzle breakage. The only way I seem to be able to get it to adapt is if the entire cap is metal, but the cost of that would push the whole VRV into several hundreds of dollars per item. I’m not prepared to do that yet.
The latest and greatest news was my supplier getting a new plastic production process for flexible materials, and they are graciously including me as one of the exclusive testers of their new machinery. Only a handful of high-level clients get this honor, so I’m on the ground floor. If these work the way they say they will, I won’t have all the dimpling and stipling that occurred on the 2nd round of prototyping.
Update 4/10/19
There have been many updates in the last few weeks (I’m feverishly trying to finish this asap) so I haven’t had the time to write all the recent things. I don’t have time to go into detail and post images, but here’s the current progress:
I’ve modified all the appropriate plastic tolerance so everything should fit together snugly. I got approval on the flexible plastic prototypes and should get ten of those any day now. The text on the VRV Cap Cover and other components was too small and thin, so I remodeled all of that and adjusted the orientation a bit. I still have yet to get the approval for the lasercutting on the carriage spring, but I’m literally expecting an email any minute now. I’m a little surprised my manufacturer here hasn’t just done it, because they are typically on the ball. I made a parametric grid to optimize their material, and I’m hoping they can make 100 of the springs in the first shipment. I’m still waiting for my cam and link springs from my manufacturer as well, but that’s to be expected; their lead times predicted I wouldn’t get the springs until June.
My pin array was accepted and they think it will cast OK, however the rod array didn’t pass inspection again. This is like pulling teeth. I’m learning a lot from this project. It’s easy to make this type of project one-at-a-timing, but what I didn’t expect is the manufacturing approval process and modeling process for mass producing dozens or even hundreds of components. They don’t just accept flimsy or tenuous geometry when they are taking the risk of manufacturing a large batch of components, so it’s been a lot of back and forth.
The good news is, I’m only 3 parts away from having all the components to build a fully functioning VRV. I’ve started moving on to other VRV accessories and other IDI plastic components. Also, I’m researching ways to strengthen my already hi-temp and hi-strength materials I’m currently using. My plastics are rated for 350+ degree temps and good strengths, but I’d like to see if there are ways to improve that even more, either by finer laser resolution, plastic resin infusion, heat tempering, or other chemical improvements. We’ll see. The hard part right now is getting all my metal parts resolved ASAP.
Update 4/21/19:
I got my top- and bottom-carriage prototypes and they are perfect. I’m kind of shocked how great they turned out. Also, I got my 12 diaphragms and they are ok. That flexible plastic has some odd edges and dimpling, but I think I can make this work. If I get the pin and rod assemblies soon, (should arrive any day now), then I can test the darn thing out. But I can’t do that until then. If they hold vacuum, then I’ll put in an order for 100 diaphragms and carriages. There was a slight problem with the diameter, and I think the flexible plastic doesn’t fit just right, so I might need to adjust the tolerances on the cap ceiling or the diaphragm itself. I got to talk to my manufacturers on why their production ended up so off the 3d model spec.
Next, I got approval on the flat springs so I decided to put in an order for 360 instead of 100. It was only a marginal increase to get 260 more springs, so I’m going to have plenty extra. They put the job in their queue and I’m still waiting for word on when it will be delivered. Maybe a week or two. Or three.
Lastly, the extension and torsional springs are still in production, hoping to have them by early May. I called to make sure everything is in order, and they said my tooling is in the queue. I’m getting 600 from that company.
All in all, everything I’m amassing will be “MADE IN THE USE and ASSEMBLED IN THE USA.” No chintzy parts for my VRV production line. Also, all my parts will be backward compatible with the original VRV modules.
Also, I got my first proof for the VRV nozzle connector prototype. It looks really spot on, but I never really intended for these to be printed. Instead, I plan to print a small mold so that I could pour my own rubber connectors in a larger batch instead. I need a line on a good heat resistant rubber or plastic that is flexible, like the stock ones, but not so darn expensive. I seriously doubt anyone would pay more than a few bucks for these things, so I need some affordable plastics or rubbers instead. Maybe even some recycled rubber crumb might be a good material… I’d have to experiment.
I’m also considering making two versions of the IDI Online VRV: one plastic economy module, and one heavy duty module with an aluminum cap nozzle. IDK. I gotta think about it, because the aluminum version would cost me over $40 per cap to produce. For just the cap.
Onward. This is the light at the end of the tunnel. I would be thrilled if I get all these parts, put it together on the first try, and it works perfectly. But I know that’s wishful thinking, and it might still require some minor adjustments once it is all put together.
Update 4/29/19
Some bad news. My flat spring provider (Rouge Valley 3D) has dropped the ball. I would NEVER recommend their services in the future. Avoid them. I’ve waited 3 weeks after paying them for some work, and they have avoided all of my calls and emails. Shady business practices. I’m now disputing the payment for lack of services rendered. I’m moving to another manufacturer and we are working out the details. Thankfully I already have all the requisite export contour files and drawings done so it was easy to transfer the data, but it was hard to find a company that was willing to work on the tight schedule.
Also, the plastics are coming along nicely. The last round of prototypes looks spot on, except for the VRV cap cover. I’ll readjust that and move on.
I tried to disassemble my rod and pin assemblies with a typical wire cutters and grinder. There is a bit of cleanup that needs to be done with the rods and pins before they can be installed in the VRV. These are just so small and fragile, that I’ll need something a lot more precise to cleanup the surfaces. So I bought a fine tuned drill chuck and set of 0.3mm-1.9mm drill bits to get the precision just right. I need this to be good down to the 0.01th of an inch, so precise bits are crucial. Also, the sanding is a lot more work than I expected, because the steel is pretty darn strong. Props to the manufacturers with making a quality product.
Lastly, I’m working with the metal company in NY to get a deal on buying a few hundred of the carriages. Still waiting to see what they offer as a discount.
Update 5/2/19
Great news. I found a new flat spring provider in Utah that can get these to me by May 15. Much nicer shop and much easier to work with. Also, my New York carriage suppliers are handling my order of a 108 elements for a small price reduction. Small, but I’ll take it. Also, it’s in steel now, instead of brass.
Lastly, I got the large order of diaphragms put into the mix. I have some diaphragms right now, but my large order should be good for the first round of parts. This is going to be good.
Update 5/4/19:
Some bad news, but not totally bad. My mass-production round of 3D models were rejected by the metal supplier, but we are working on different clusters that can conform to their specs. I had already configured everything to the specifications (their publicly stated specs, that is), but apparently after further review, their techs decided my model had too many “sprued” geometrical elements that would make it hard for the casting to work. I have to decide if I want to blow 5x the money on brass which can do these small thicknesses, or remodel it to have steel but in a different more linked-up design orientation. I went with the latter, and I’m hoping to hear back from their techs on if this will pass the third inspection.
Also, my plastics production is coming along well, but still having some calibration issues. Gotta keep on keepin on. Hope to have my calibration all done by Monday or Tuesday. Then do the last round of test prototypes. If that works, then I’m going to pump out these housings as fast as possible.
Update 5/10/19
Just got an email from my flat spring provider and they finished cutting all the discs. Should be arriving any day now. Also, I’m supposed to have my extension and torsional springs any day now too. My carriage castings are “in production” according to the supplier, and my extra rod- and pin-clusters are in the works as well. Lastly, the Diaphragm units are being made as well, and I’m going to get 100 of those, for $5.25 a piece. OUCH. I’m dropping way too much money into this “hobby.”
Also, another part took a bite out of my wallet. The carriage models I made couldn’t be cast in steel, so they are not the affordable few bucks a piece that I expected, and instead I had to blow over $2000 to get them done in brass. This is getting out of hand. It’s almost as if all my suppliers know I’m near the end of the tunnel, so they are fleecing me for every penny got put into this. I’m just hoping all you VRV fans out there are willing to buy one or two of these so I don’t go to the poor house before I can finish all these units. HA!
Update 5/15/19
Got the flat springs. Nice work. Quick service and near exact specs. They couldn’t provide a 0.009″ thickness, but provided a 0.01″ instead. Close enough.
Still waiting on the extension and torsion springs. I got confirmation that one of the jobs was finished, and the other was in the queue. They said it will ship asap.
Update 5/17/19:
The torsion springs arrived and they are perfect. I even tested them out in one of my new 3d printed housings that I made in-house. Things are really coming together.
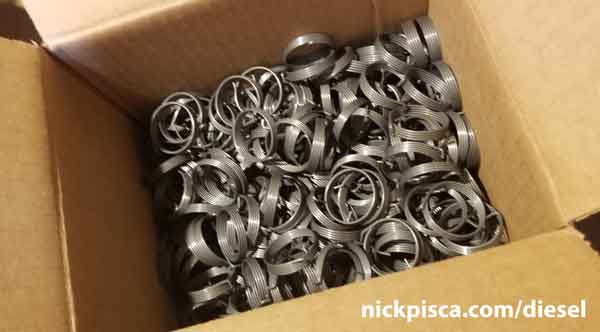
I bought a few hundred torsion springs because the majority of the money going to the spring supplier was for setting up the equipment. So I could spend a few thousand dollars for a few dozen springs, or spend a few thousand dollars + $250 for a few hundred springs. So I have plenty of spares.
If they did such an amazing job with the torsion springs, I’m excited to see how they did on the extension springs.
Update 5/21/19
I got the extension springs. Hmmm. They are about an 1/8″ too long. I need to re-review my drawings to ensure they built them according to my drawings, but as they are now, they probably won’t work. If they do end up not working, I think I might just cut off the end and bend it myself, assuming the metal allows that. So it’s not the end of the world.
Now that I have at least 1 of every single part from my suppliers, I actually got to put together a whole VRV made completely out of new parts. Unfortunately due to a slight issue with the carriage depth, I had some issues with the flat spring extending as far as it should. I fixed that by switching the top carriage with the flat spring. That performed pretty much exactly as the stock flat spring did.
Next, I tried to pre-drill my holes on the rods. My nice steel-rated drill bit cut thru the top like nothing, however, my dremel-style bits for the bottom broke almost immediately. I need to find a good quality 1.8mm diameter bit asap. Something that can cut brass without getting too dull too quick, and won’t snap like the Chinese crap I just bought.
Lastly, my current VRV mockup didn’t hold pressure. A little bummed. I was kind of hoping it would work on the first try. I think I know the issue…. I didn’t glue the diaphragm in when I seated it. I was hoping it would hold vac pressure without glue, but that was wishful thinking. All the VRV’s I’ve rebuilt in the passed required glue to seal the cap, so this should be no different. I mainly didn’t want to glue it because if I need to take it apart to do modifications, then the glue might permanently ruin on of my nice diaphragms. I’ll glue it for sure once I know my armature is properly calibrated.
This is kind of exciting. First time I assembled a completely new VRV with completely new parts. Nothing from an old VRV. If I can get the seating of the diaphragm sealed up, then it’s just about getting the spring calibration perfected. Then I just need to wait for my box of diaphragms and carriages to arrive so I can put a bunch of these together. And I need to get a box of small screws, which I still have not found anywhere in RL or online. And, I need to start thinking of packaging… Very close now. Very very close!
Update 5/22/19:
The plastic sealants arrived, but I haven’t coated the assemblies yet. Also, I was able to calibrate my plastic sintering machine to produce over 6 housings in a single batch. That’ll get things moving. Here’s a picture of the new “complete” VRV on the IP stand:

It still needs the sealant, I need to adjust the spring length, and I need to fine tune the rod aperture, but it’s getting very close to a viable product. I’m still waiting for my diaphragms to come in before I start to seat my only current diaphragm. I’d hate to ruin that testing diaphragm before I have the batch of 100 come in from my supplier.
Update 5/27/19:
Finding an American screw supplier has been a nightmare. I found a substitute for the original stock screw that is really close, and I can even just buy a bunch of them from a typical hardware or home store. However, I want my VRV to be 100% American-made, so I’m shopping around.
Not a single one of the websites I visited from supposed All-American suppliers had a functioning website. No wonder the US fastener manufacturing industry is dying off; they are not even trying to sell online. Basically, all the websites were malfunctioning in some form or fashion. Of the ones that had some kind of navigable capacity, they inevitably required me to call in to get a quote or read their 360 page PDF catalog. What a crock. I just wanted to order 300-500 screws by clicking on a few buttons and putting in my credit card. Nope. I sent out a few emails to the sales departments of a dozen major USA screw companies, and I’ll have to wait until after the holiday to get an answer. That blows probably another week on my projected lead time on getting a bunch of these assembled.
I’m still just shocked none of these companies has an online store. They are likely hemorrhaging money and wondering why they can’t compete with the foreign suppliers. Yo! Wake up! It’s an online world, so get a decent website with a shopping cart, people!
I bought a new type of plastic sealant that is supposed to seal up porosity to ensure a good vacuum, increase the plastic strength, and also improve the resistance to heat and chemicals. I tested it out on my plastics that failed in the production process. It looks good and doesn’t leave a thick layer. Not bad.
I’ll give all my inventory a good bath of this stuff prior to assembling the first 20 of these. Also, I’ll run a vacuum test on these as well, to make sure the supplier’s claims are up to par.
Lastly, we’ve been working on a way to produce more of these plastic housings using recycled materials, but it’s still in the works. I was able to do a production of 6 to test them, and the tolerances are a bit off. Something minor, like 0.1 or 0.2 of a millimeter, but it’s enough for me to notice the cam rubbing on the housing. Also, some of the interconnected parts fused together, so I had to scrap about 10% of the parts. Not to worry, we’ll recalibrate the plastic machine for now to compensate for the 0.1mm offset. I’ll do another run in a few days after the holiday.
Update 5/29/19
I still got some things to tweak (the spring and the mating surface for the rod and cap), but it’s looking good. Also, my cam-links are looking a little weak, so I might need to change my laser-hatching pattern to get a stronger hold. Or maybe remodel them to have web-stiffening to reduce the bending. Also, I might need to do a longer porosity resin bath to ensure my plastic pores are completely resistant to the vacuum pressure.
I’m going to drive this around some and make sure it works in practice. I’d say by the end of June, then I’ll have a bunch of them done, and I’ll have tested it enough to ensure the batch that I have will hold up to the typical IDI wear and tear.
Also, I found a company that sells American made screws and washers that can get me a few boxes by June 5. That means the VRV is 100% Made in the USA, and Assembled in the USA, with 100% American-made parts.
Update 5/31/19
Well, I had a camlink break on me after sitting for a day with the spring pulling it. I’m a bit surprised, because I sintered that plastic in a way that would ensure the best strength based on the specs of the machine. I think I’m going to look at the 3D model and see if I can add some web stiffeners to the outside corners and make sure it has more rigidity. Also, i’m going to see if I can potentially heat-strengthen this camlink some kind of way. Or maybe re-sinter a new batch of cam links using a brand new mixture of powder instead of the stuff I had been using. I really don’t like the design of the original VRV camlink, so I might do a complete redesign, which can take advantage of my too-long extension springs. win-win.
While I’m at it, I also might redesign the housing cover as well. Turns out the reason why the camlink was bending so much, was because the housing cover was curling up as well. Maybe if I add more protruding stiffeners to the cover, then it’ll keep the camlink from bending beyond the spec. I’m a little bummed out because I printed about 2 dozen of those covers and now I might have to scrap those for now. Or I could sell them individually if necessary.
Still waiting on the shipment of new rods and pins. I have to figure out a method to semi-seal the gaps round the rod and pin to make the vacuum bleed slower. I was using wax for testing, but that won’t work in a hot engine bay. Maybe a high-temp rubber or silicone. The hard part is, how to ensure that it doesn’t seal up completely. This is a fine balance.
Update 6/3/19
Assembly testing has been a bit disappointing. The cam links are bending more than expected. Also, I don’t get a consistent seal on my pins and rods, which is weird, because I personally drill the 1.8mm hole on my press. I wonder if the interior of the rod gets a small bur or something that is not getting a good seal. Lastly, the cap vac hole doesn’t mate well with the rod, because the diaphragm tends to bubble out, instead of lay flat on the cap orifice. Sigh.
I’m working on solutions. I have some ideas and testing different things. I tried to make a drilled hole that bleeds some vac pressure so that it doesn’t overpressurize when the throttle is at WOT. More to come.
Update 6/16/19
Sigh. I’m getting some odd vacuum pressure issues with the VRV. The vac bleeds off way too fast than it should. I couldn’t figure it out, until I bought a microscope. I found the problem. It was the pin texture. I had the pins and rods cast by a company in New York and they are within my measurement specs. However, what I didn’t account for is the texture of the parts.
These parts are extremely small. Check this out:
At first glance, it looks a lot like the original pin. I changed the top from a chamfered orb to a sphere, but other than that, it looks pretty much the same. When I put it in the assembly, it worked ok, but the vac pressure didn’t hold as well as the original. I didn’t worry at the time, because even the Ford Service Manual and all VRV calibration instructions stated that it will siphon off some vac even when it works properly. So I figured it was good as is.
However, under a microscope, I found the problem. There are microscopic pits on the casting on the left, in contrast to the stock pin on the right.
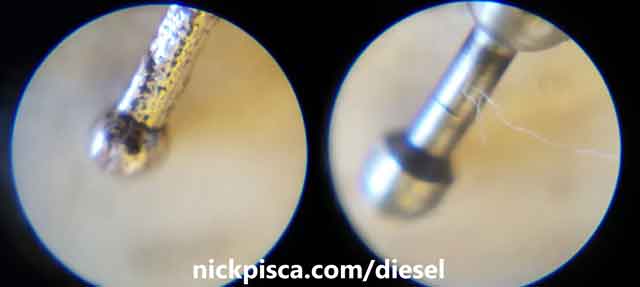
For the most part, these pits don’t really matter, like on the shaft and the tip of the pin, as shown in the image above. But where the problem is, is where the rod and pin mate, they need to be smooth to ensure the vacuum resistance. See the difference below:
Fortunately, I’m able to polish the inner mating cylinder on the rod to make that work, like in the image below:
However, I need to find a way to polish the base of the pin to make it mate perfectly.

I’m kind of surprised how tight these tolerances are. In the image above, I polished the pin and the inner surface of the rod, and it looks really close. Even under a microscope, it looks like the tolerances are negligible. But that rod and pin in the image didn’t hold vac spec. This is crazy.
I’m hoping I can keep the pins I already made and invested in, but it looks like I might need to source some of these special pins from a supplier if I want any kind of bleeder vac consistency. My equipment just can’t make these as precises as I need them.
This is likely delay my VRV mass production even more. I don’t have a lead time at the moment for this part.
Update 7/30/19:
It’s been a lot of work, but I think I finally found a solution to the pin issue. I don’t have any picture, but I’ve been testing prototypes, and I finally got a viable reliable solution to the regulator bleeder issue. I just tested a variation on this prototype and got Ford spec output without losing massive amounts of vac pressure. I’m going to run this on the van for a week or so to see if it has some longevity. This is huge. If this works, I can start assembling an inventory of 100% new VRV’s and get some of those units out to the people at the top of the waitlist.
Update 9/19/19:
I’ve been rebuilding a lot of these VRV’s in the last few months, and I’m gradually learning what is and what isn’t fixable by the average mechanic/owner. If you need to buy a replacement cam, cap cover, housing cover, or torsional spring, that is pretty simple to fix on your own. They just pop out and pop back in. However, pretty much everything else (replacing the housing, cam-link, extension spring, etc) probably should be sent my way. Also, there are some parts that I would insist on fixing myself, like the cap, diaphragm, carriage, etc. The problem is, most of these parts were never designed to be rebuilt. Ford just wanted to you to buy a new VRV, instead of fixing part of this device. Pulling the diaphragm or extension spring out of the carriage is a very precise activity, and one slip up could mean the tearing of the diaphragm, cracking of the cap, or worse, loss of the pin and spacer.
So as of now, I’m going to have a policy of not selling the cap, extension spring, carriage, diaphragm, housing, and cam-link as a separate item. Feel free to leave a comment if you disagree. The problem is, even if you achieve the replacement of these parts, you still don’t have the apparatus to calibrate the valve, so it’s kind of pointless for me to sell these items individually. Also, over the last year, I have amassed a rather precise set of tools to expedite my process of rebuilding the VRV’s. I have been able to do a full cap and diaphragm replacement in less than an hour now. I’m getting pretty fast at it. Overall, it’s just easier, cheaper, and faster to send the part in for me to replace the parts. Also, while I have it, I can check over the rest to make sure the whole VRV is back to Ford vac spec.
Lastly, Something I’ve noticed in the last few weeks are some of the aftermarket VRV’s have slightly different sized diaphragms, springs, and other parts. I designed all my “IDI Online” VRV replacement parts to be backwards-compatible with any original VRV, but the aftermarket ones must not have had a good quality control. I’ve noticed different size and depth diaphragms, carriages, springs, and other items. The good thing is, I have almost all the parts necessary to rebuild your VRV. However, if I just sent out a new diaphragm from my inventory to you, it might now seat into your aftermarket housing properly due to these sizing variances.
Anyway, that’s just how it’ll have to go.
As for progress on the 100% new VRV, I’m still working out a solution for the bleed rate. I am contemplating buying a lathe to make my own pins in house, because quotes for the pins are getting very high. I’m also looking for alternative materials that might be more forgiving. Onward!
Update 10/7/19:
I found a manufacturer for the pins. It’s still way more than I wanted to spend and I can’t keep dumping more money into this project. And there is no guarantee these will work because the texture still might not be ok. But I’m 100% sure it’ll be better than my current supplier that has that pitted texture. They assured me that they are within a tolerance of +/- 0.005″ and that should work. But the problem will be the smoothness. They were able to assure me less than 125uin/3.2um Ra but that might not be enough. And the hard part is, it cost me about the same amount to make one pin or 50 pins. So I figured why not make a hundred and see if it works. It it doesn’t work, I’ll be out a bunch of cash, but I’m hoping it’ll be more conformed to the proper tolerances than my pitted cast inventory that is all janky and messed up.
Update 10/23/19:
I finally got the new pins, and they work 100x better. Geez, these pins were expensive to get, but it appears they were worth it. I was able to make 4 of the new VRV’s that are functioning to Ford vacuum specs. I’ll keep making a bunch of these new VRV’s and start fulfilling the orders on the waitlist. The only bad thing is the pins had a slight burr on the end of the bell, which I have to hand polish each and every one. And also, due to minor machining tolerances, I noticed that not all my caps are usable as is. That’s why I only got 4 done today. I’m going to refine my production process to make sure the receivers in the caps are more accurate down to the hundredth of a millimeter, which will ensure perfect vacuum bleed off.
The really good news is (maybe even bad news) is these pins are so precise (except the burr) that the bleed off is a bit too SLOW now. My problem before was that the pitted pins allowed too much vacuum to leak, but now with my newly machined pins and vacuum-safe plastics, the mating of the two tends to hold a little too much pressure at WOT. Kind of crazy. But that’s minor. The big news is, I’m making headway on the mass production end of this project.
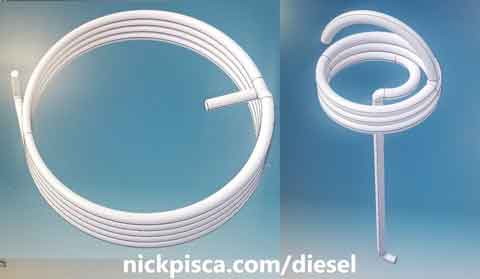
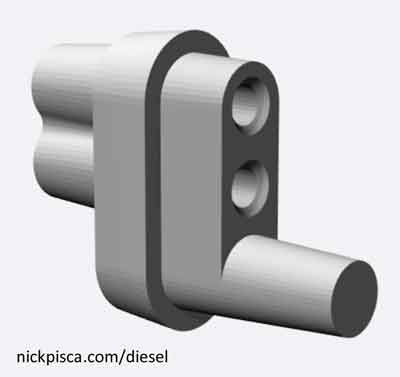
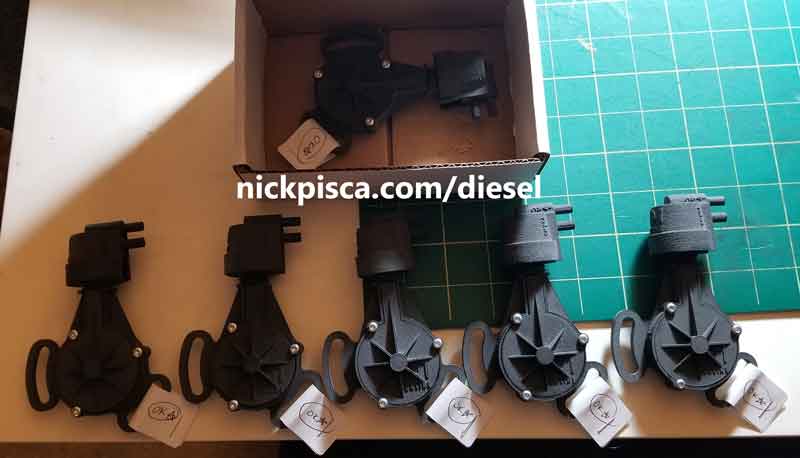
Also, I’ve expanded my inventory of parts now, to include the Truck IDI Vacuum System Manifold (or Vacuum Tree or Vacuum Hub, as some people call it). I plan to have the Van IDI Vacuum Manifold as well in a few weeks. Check it out here:
I’ll try to make several dozen of these new VRV’s so they are fully in stock when new orders come in. I have a lengthy waitlist, and some shops that want to have a few in their inventory, but after that, I’ll have them fully-assembled, boxed up, and ready to ship out to people and transmission shops probably in a month or so. Due to the massive investment to have hundreds of custom springs, flat springs, diaphragms, pins, metal carriages, and other parts custom made across America, I’m thinking of charging between $199-$249 for a new VRV. I’m probably not going to break even on this for years, without charging a decent amount. It’s still cheaper than swapping out the C6 transmission or rigging up something on your IP. My new VRV will bolt up exactly like the old stock VRV, and it conforms to the proper specs. I’ve had clients tell me their trucks and vans have not shifted this good in decades, so I’m hoping my parts will fill the gap left after they stopped supplying these parts.
Update 11/16/19:
Some good news. I’ve been gradually fulfilling the waiting list. If you have been on the waiting list for longer than 6 months, check our spam email folder just in case you didn’t get a notification. If you are within 6 months, I haven’t gotten to you yet.
I’ve been trying to assemble these as fast as possible. It’s a bit slow, because I can only make them in batches of 6 at the moment.
Update 12/6/19: (Halfway through the Waiting List, and GM Cap Transfer Doesn’t Work)
 I’ve been getting through some of the waiting list and rebuilding more VRV’s in the meantime. I just emailed out another dozen people on the waiting list to see if they want their part now or go to the back of the line. I’m working my way through the list and I hope to have all fulfilled by the end of the year. That’s a lofty goal. Maybe the end of January.
In the meantime, I decided to see if it was possible to use the GM VRV cap on the Ford VRV body. Long Story Short: IT DOESN’T.
While the cap does fit on the Ford housing, the cam groove is very different. The GM has a shallow slope linear proportion, while the Ford has a variable rotation. When I put the frankenstein VRV on my IP stand, the idle throttle vacuum pressure was up to Ford Spec, and I calibrated it to match up at .515 and WOT. I almost thought “Wow, this works,” however, I quickly learned why it wouldn’t.
With every VRV I calibrate and inspect, I also check the bleed-off rate at all rotations of the throttle position. That revealed the problem. As I rotated the throttle, the pressure would drop from Idle to WOT, but it did this crazy dip from mid to WOT to almost no pressure. That would be consistent with the variable Ford cam groove, but not with the GM cam groove. So the only way this would work is if the GM cam could fit in the Ford housing (accommodating the differentiation in variable cam-link extension), BUT that can never happen because the GM cam rotates the other way than the Ford (because it’s on the other side of the IP.)
I was kind of hoping this could save me a few dollars on rebuilding these VRV’s. It really doesn’t. I spend a little more than the cost of the GM VRV on all the intricate parts that go in my IDI Online Brand VRV, so it’s a horse apiece. Knowing that the GM VRV won’t work, I can just focus on making new VRV’s with my current line-up of American-Made parts instead.
Update 12/29/19:
Some good news. I’ve contacted everyone on the waiting list. If you were on the list, and didn’t get an email from me, then check your spam or promotional email folders, or contact me asap so I can fulfill your order.
I’ve revamped my plastics production process to improve my vacuum pressure maintenance even more than before. That means I’ll have even better vac pressure on future models of the VRV. And I’ve improved my valve mating surfacing as well. So far so good.
I’m offering a holiday deal. For anyone buying a new VRV before the end of 2019, I’ll offer a 5% discount. Can’t hurt to get a new VRV or even a second backup valve just in case. 🙂
Update 1/9/20. Core Reimbursement Rules:
I’m implementing a $25 core charge on all VRV purchases. For the last few months, I have been just using the honor system and hoping everyone would send their old VRV in within 2 weeks. It’s been hit-or-miss.
To redeem your core reimbursement, mail your old VRV to
0001D LLC
526 Hill St
Inglewood, CA 90302
Be sure to enclose a note including: Your name, email address, phone number, and paypal account handle (so I can send you the $25).
I’m going to insist on some rules on what constitutes a good core. If the core has been modified with the GM-brand cap, I can’t accept the core. I need Ford parts. Also, if the vast majority of parts are damaged, I can’t accept it either. The main parts that make a good core are the housing and cap internals.
I’ll make that determination upon inspection. Sometimes the worst looking VRV still can be rebuilt. It mainly depends on the condition of the internals. Of the dozens of VRV’s I’ve received, there was only one that I didn’t accept the core. So it’s likely that your old VRV will be accepted.
Also, you don’t have to buy from me to redeem the reimbursement. If you did a transmission swap or just wanted to throw out your old VRV, send it my way. I’ll give you the $25 regardless.
Update 7/17/20.
Things are going well. I’ve been refining my manufacturing method to get better and better at making these VRV’s. Also, I’ve been refining my plastics techniques to make it more resilient against vacuum issues. Also, I’ve been improving the strength of the plastics, as shown in the testing video. Onward.
Update 12/1/20:
Things are still going well. I’m stocking up my parts inventory at the moment, ordering more brass and flexible parts from my USA suppliers. For the most part, the suppliers are giving me the same quotes across the board, except for the center pin. The CNC machining company I’m using told me that they lost money on the previous order, so they are upping the price three-hundred dollars for the batch on top of what I’m already paying. Yikes. I thought the pin was already overpriced, but I guess I got a bargain. I’m going to keep the price of the overall VRV the same even though my suppliers’ costs increased a bit, but I’m going to raise the price of the pin an extra 4 dollars just to keep up with the uptick.
The lead times for my surplus parts are 4-6 weeks throughout this Corona lockdown, so hopefully they stay on track. Some are putting receipt of my parts somewhere in mid January if all goes well. I don’t think I can wait much longer. There may be a few weeks where I’m out of replacement parts near the end, we’ll just see how the demand for these VRV’s increases. I still have to make a few more orders before the end of the year. Onward!
Update 2/6/22:
I’ve been looking for ways to improve the assembly process of these valves to save me time in machining the tiny components. I’ve sent off for an order of 100 microlathed rod parts that should make the bleeder and pin connection a little easier for assembly. I’ll post some pictures once they arrive, but they aren’t expected to be until Washington’s birthday. I hope this won’t impact the price much. While it costs me more to have these rods machined for me, it’ll save me time overall on the processing of a batch of parts. I just hope they work, because I had to spend over one thousand dollars to have these set up on the lathe.
Update 3/6/22:
The microlathed parts came in and they do help a lot. While it costs me 5x as much to get these parts than making them myself, they do save me a bit of assembly time. So it’s basically the same cost overall, so I won’t change the price. I got a huge supply of powder in the mail recently as well, and begun the process to transfer all of it to my supply containers. It comes in a massive double-corrigated box with large 10-mil 5-gallon plastic bags. That’s not the best way to store some very expensive powder.
I’m working on building up my VRV supply again after all this delay. There’s a bit of a waitlist (9 people, plus some rebuild orders) but that should be resolved by the end of the week. Then I can go back to building up a decent ready-to-sell inventory.
Also, I’ve had a rash of scammers. People making orders from outside the USA or from nefarious IP addresses. They file false claims and try to get Paypal and vending payment services to refund their purchase money while the part is in transit. Thankfully due to my assembly delay, none of the parts were out for delivery yet, so they couldn’t get the part, however, every time this happens, it costs me $11-17 per transaction (EVEN AFTER I RETURN THEIR MONEY). It’s a terrible vendor policy, but I have no way around it. So, in the future, if a customer wants a refund, I’ll need to have the part at my shop, and if it functions according to Ford Spec, then I reserve the right to deduct 10% from the price as a “restocking and vendor reimbursement” fee. Sad it’s come to this, but I have to keep the scammers at bay.
Update 3/3/2025
I’m still rebuilding VRV’s. If you have an old VRV, please send it in. I’ll fix it up better than stock.
I’m also removing this god-awful adsense from my website. I think it does more harm than good. The hosting company suggested I put ads on the website, but over the last 3 years, it’s only hurt my business than give me any ad revenue. Google is a scam.
I’m hoping it’ll clear up some of the messiness on my website and provide a faster option to my customers for rebuilding VRV’s. .
Update 3/12/2026
I’m still rebuilding VRV’s. Keep sending them in.
I don’t have any already rebuilt VRV’s in stock. I need more cores in order to have that.
Just a reminder, I don’t make new ones anymore. Just rebuilding the old ones.
.
.
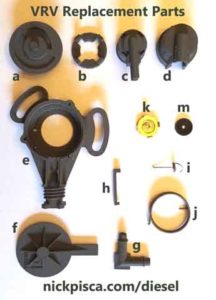
VRV C6 IDI Replacement Part Inventory. See chart to the left for pricing.
Current Inventory :
| Item | Label | Price (w/o tax) | In Stock? | For Individual Sale? |
|---|---|---|---|---|
| Cam | a | $23.00 | Yes | Yes |
| Castle Nut | b | $13.00 | Yes | No * |
| VRV Cap | c | $23.30 | Yes | No * |
| Cap Cover | d | $23.00 | Yes | Yes |
| Housing | e | $49.00 | Yes | No * |
| Housing Cover | f | $19.00 | Yes | Yes |
| Vac Hose Elbow | g | $14.00 | Yes | Yes |
| Cam Link | h | $9.90 | Yes | Contact me |
| Extension Spring | i | $9.90 | Yes | No * |
| Torsion Spring | j | $14.00 | Yes | Yes |
| Carriage w/ Spring | k | $24.90 | Yes | No * |
| Diaphragm | m | $19.90 | Yes | No * |
| Metal Pin | N/A | $24.90 | Yes | No * |
| Metal Pin Housing | N/A | $27.20 | Yes | No * |
| New VRV | N/A | $199 + $25 Core | Yes | Yes |
| Rebuilt VRV | N/A | $XXX + $25 Core | N/A | Order Now |
Contact me to discuss options and shipping. If for example, you cracked the main housing flanges overtightening it to the IP, I could sell you this main housing. You would have to transfer the old VRV parts over to the new housing, but this could fix your problem. You would have to pay for shipping. WARNING: The components of an original VRV are very old, brittle, and delicate. I would HIGHLY recommend sending your VRV in for rebuilding, rather than attempting to fix it on your own. You could potentially brake other parts of the VRV. Read below for info on sending the part in for rebuilding. *Why can’t I buy these separately?
.
.
Inspecting and Rebuilding VRV’s:
I could rebuild your VRV if you ship it to me. I would need to examine the piece to figure the problem out. Inspection costs $42 and I’ll give you an assessment of the VRV before I do any work on it. You pay for the shipping to my shop (I recommend insuring it for $250, just in case). Rebuilding costs are determined by what needs to be replaced, maintained, or lubricated. I use a plastic-safe lubricant to unsure any surfaces won’t degrade. Contact me to discuss options and shipping.
| Item/Service | Price |
|---|---|
| Inspection including return shipping** | $42.00 |
| Cam & Link Cleaning | $15.00 |
| Cam & Link Greasing | $10.00 |
| VRV Unit Calibration | $25.00 |
| Part(s) Replacement Estimate | *** |
**You pay for the shipping to my shop, and I pay for domestic USPS return shipping. However, if you want it overnight or 2nd day or international or anything other than regular USPS domestic shipping, you’ll have to cover that.
**$50 surcharge for international projects
***Depends on the results of the inspection.
****Restocking and Vendor Reimbursement fee: 10% (Scammers have forced my hand, and I personally don’t get this money, it just covers my expenses from Paypal/other services)
If you decide to join in this prototyping project, you’ll need to sign an Authorization to Work and Waiver. I charge $99/hr, calculated quarter-hourly. If I only work on it for 15 minutes, then I only charge $25. If you send your VRV to me to rebuild, I’ll be sure to return all your original parts. If in the event you don’t like my prototype, you can revert back to the original parts. Considering that Ford and aftermarket manufacturers have no plans to restart selling these VRV’s, I think you’ve got not much to lose. Best case: it fixes your VRV; Worst case: the replacement part doesn’t regulate the vacuum pressure, and are back to where you were.
What’s for sale?
- Complete, bolt-on, ready-to-go new VRV Replacement Assemblies ($199 + $25 Core) Order now
- Complete, bolt-on, ready-to-go, bench-tested VRV Rebuilds ($249 + $25 Core) Order Now
- Truck IDI Diesel Vacuum System Hub/Manifold (Available now, Click here)
- Custom Heavy Duty Automotive Plastics and Fabrication. Click here for details.
What I still don’t have ready for sale yet, but soon:
- VRV-to-IP mounting bolts
- IP throttle rotator rod
- VRV Testing Gauge Block (Part No. T83T-7B200-AH)
- VRV-to-IP vacuum hose connector (Potentially in 2022)
- Van IDI Diesel Vacuum System Hub/Manifold (Potentially in 2022)
- Assorted IDI Diesel Vacuum check valves, regulators, and tees.
- 1980’s Climate Control manifold
Onward!
For more reading on the process of adjusting, calibrating, and inspecting an IDI C6 VRV, click below:
