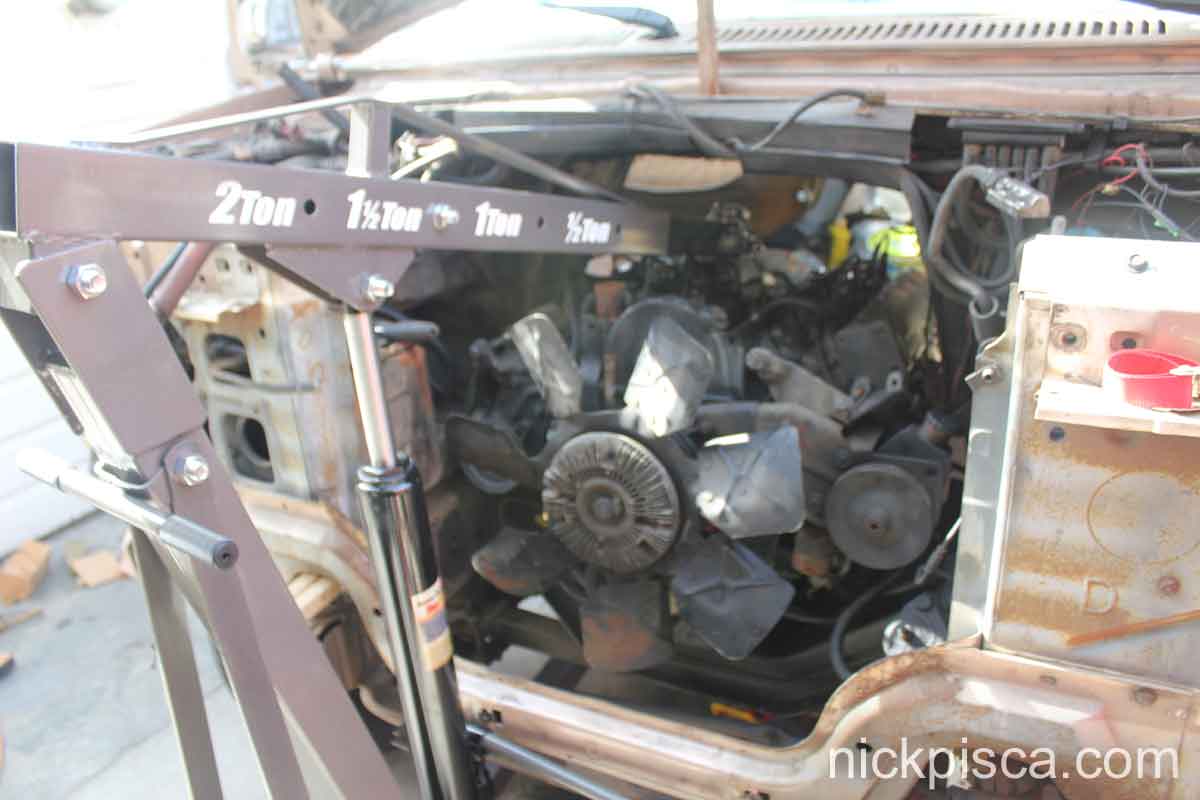
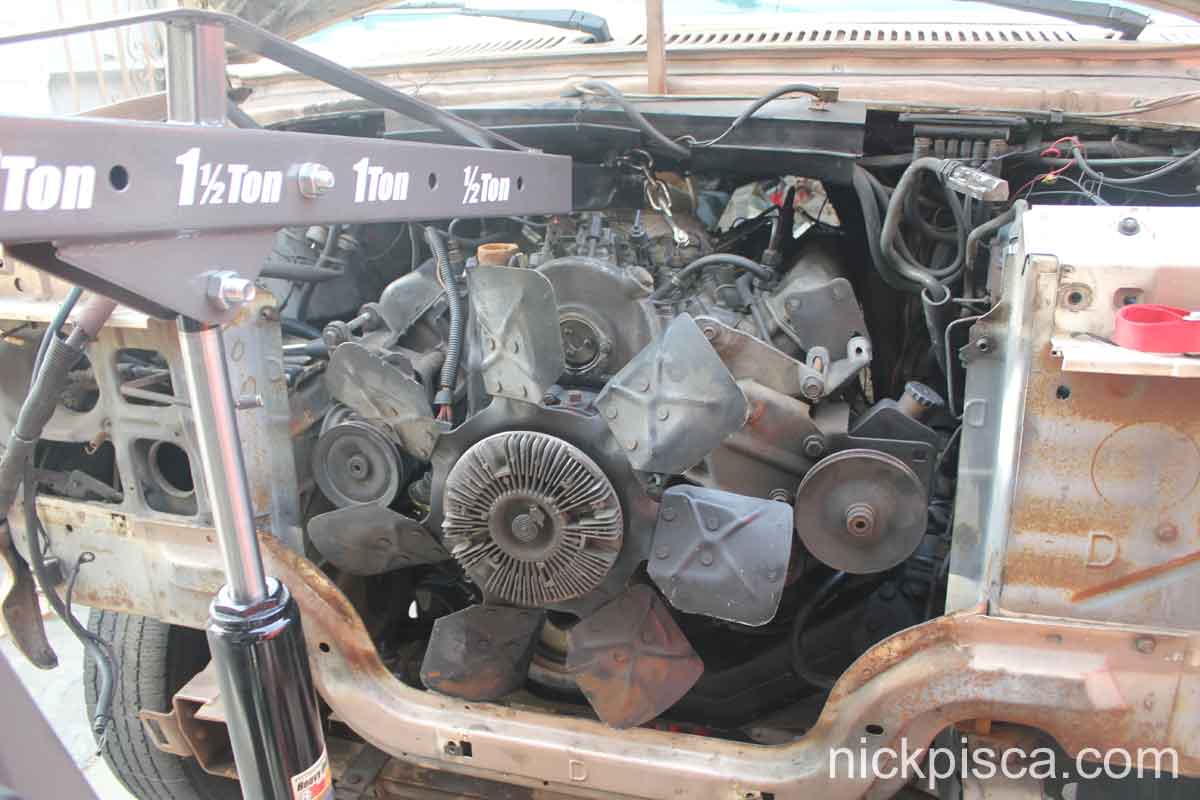
When pulling an IDI engine, you will need a 2-ton shop crane. These engines are not light, and with accessories and parts, could be at least 1500 pounds.
Disclaimer: Not responsible for any damage you do to yourself, your vehicle, your tools, or anyone or anything. For informational use only.
Next, you want to jack up the van on four jackstands. Due to the overwhelming weight of the engine, if you try to pull the engine, the suspension will rise with it. Eventually you will be at the top of your shop crane capacity. It is best to extend the suspension prior to the engine extraction. Disconnect the battery terminals.
Also, due to the small size of the engine bay on an Econoline van, it will be hard to pull the engine without pulling stuff off the top of the intake manifold. There are two ways to do this:
1.) Pull the injector pump, injector lines, and air cleaner box / turbo assembly, or
2) Jack the body up off the frame a few inches.
This article will focus the second method. This allows for the engine to keep the IP in place, which means the engine will not need to be timed later. Jacking the body up off the frame is a great trick. It affords you the extra few inches to just barely clear the injector lines from the underside of the engine bay ceiling, while just barely clearing the oil pan and front frame cross member.
Depending on your engine, you need to remove some parts. For most IDI Vans, you likely have a 6.9 or 7.3 “N.A” (Naturally Aspirated) intake system. This means you have the conventional saucer-shaped air filter box, CDR adapter, and plastic air supply hose. These need to be removed to make room for the shop crane to raise the engine off its mounts. For this tutorial, this van has the rare Banks IDI turbo system. It is unlikely your engine will have the turbo system, but the majority of this article will still apply for your needs. If you have a turbo system, you need to remove anything that is on top and at the rear of the engine intake system.
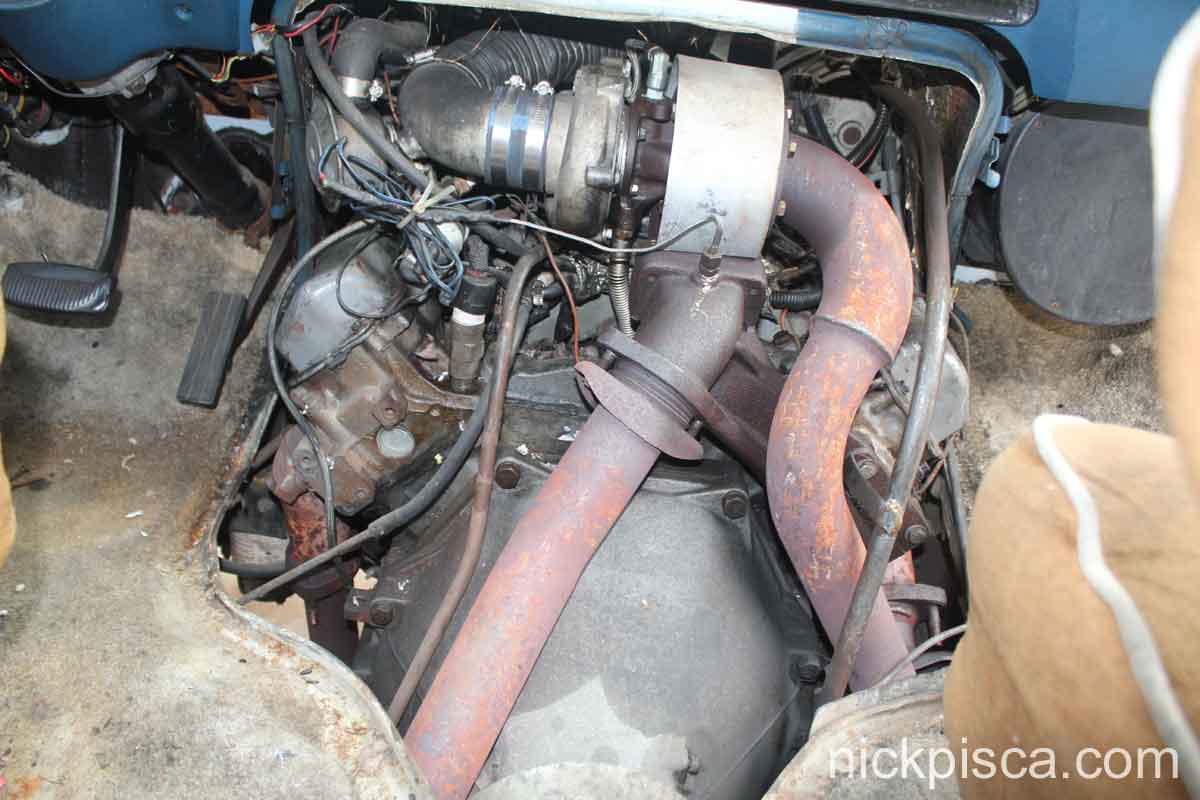
This van has the rare 6.9 IDI Banks Van Turbo kit installed. It will need to be removed to allow room for the engine extraction. If your engine is non-turbo (N.A.), you can still use this tutorial to pull the engine.
Undo the exhaust pipes and anything connected to the exhaust system at the manifolds. Undo the vacuum hose from the vacuum pump. Take off the alternator and AC Compressor. Disconnect the engine electrical connectors on the IP, engine bay, and elsewhere. Remove the diesel filter head on top of the intake. Disconnect the steel fuel lines on the lift pump and return line at the back of the engine. Disconnect the power steering pump lines from the reservoir and unit. Disconnect the engine grounds. Disconnect the tranny lines and remove them, so they do not get pinched when pulling the engine.
Drain all fluids from the vehicle. Be sure to remove the coolant from the block using this fun method. Remove the oil filter, because the engine will NOT clear the crossmember with a big oil filter still attached. Also, undo the starter and set it aside.
Next you need to separate the tranny from the engine. Some claim you can pull the engine and tranny in one piece, but I highly recommend you separate them. The Econoline engine bay is TINY relative to the enormous size of the IDI. Before you start unbolting the tranny, you should undo the bottom fly-wheel cover and gain access to the torque converter nuts. There are 4 nuts to undo. Using a 15/16th’s deep-well socket on a breaker bar, rotate the engine 90 degrees at a time to position the flywheel and torque converter at the bottom. Undo the nut and rotate it ninety degrees again. Continue until all nuts are removed. DO NOT undo the tranny from the block yet.
Remove the grill and top core support from the front. Pull the radiator, AC condenser (if your vehicle had air conditioning installed), and transmission cooler (if your vehicle had a tranny cooler) from the front of the vehicle.
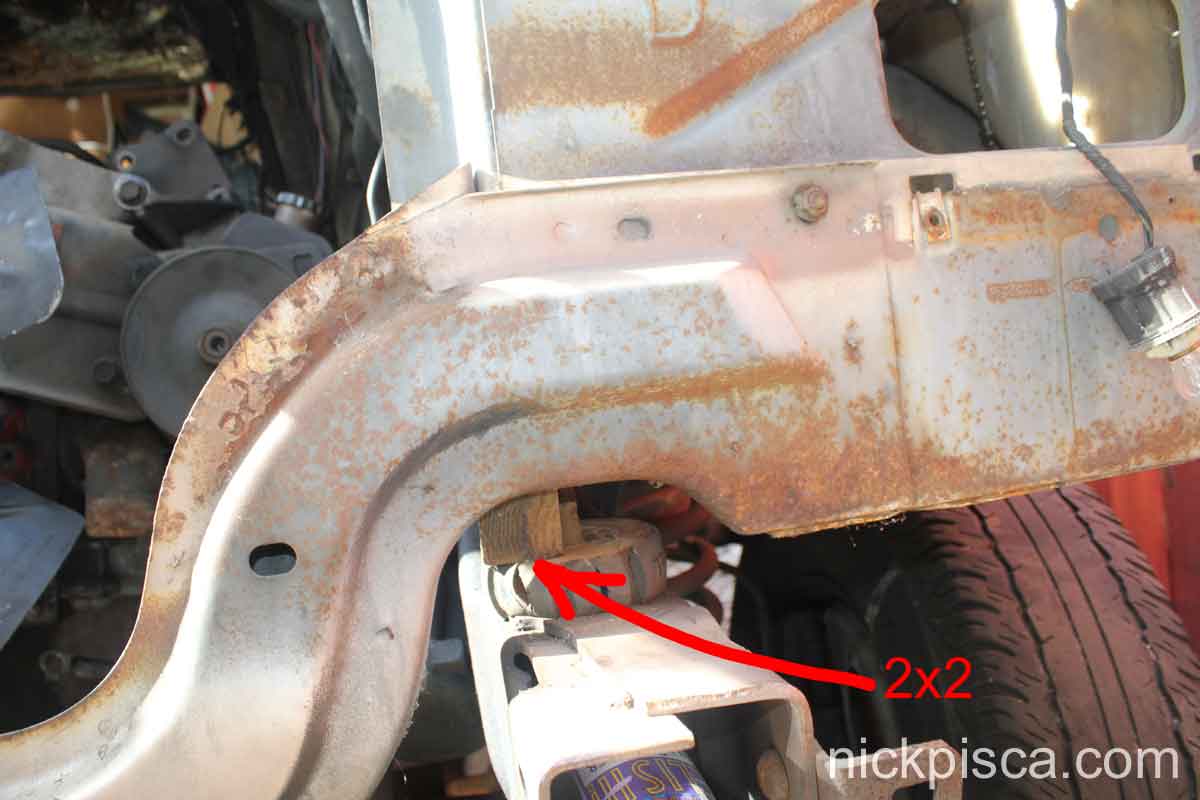
Down by where the radiator was near the frame are two extremely long bolts that connect the body to the frame. There are also two more long bolts under the carpet near where your feet rest at the front two seats. Undo these bolts so that you can jack up the body up off the frame a little bit. Wedge a pry bar in between the frame and body, and squeeze in a block. I used a 2×2 on top of the body mount to raise it up.
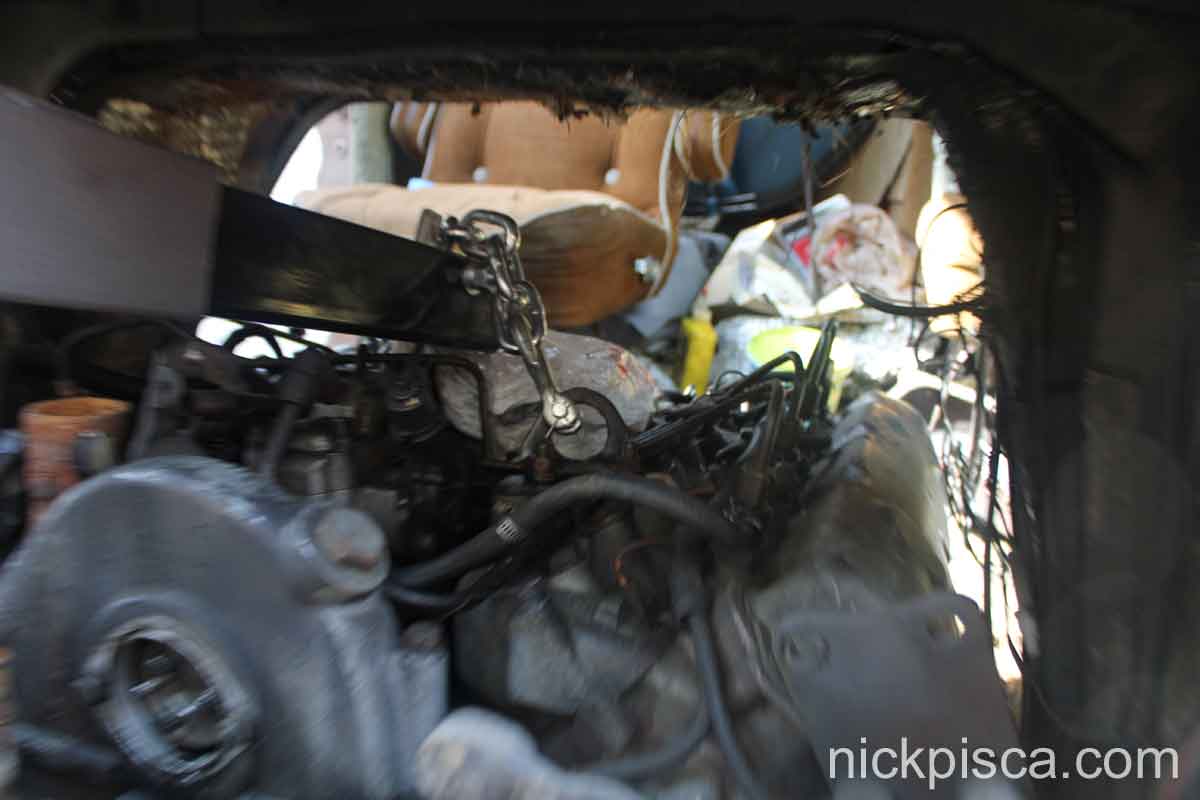
Your IDI engine should have engine pulling loops attached to the intake manifold. Remount these to the two middle spots in the intake.
Next, you will have to improvise a bit. This is not recommended. In order to lift the engine, you will need to modify the shop crane to have a 1/2″ thick piece of notched plate steel bolted to the top, so that the chain is not dangling underneath. This allows you to lift the engine with almost zero clearance.

Jack up the shop crane so that it puts a little tension on the engine. Do NOT lift it up yet.
Put another jack under the transmission and use a block of wood to distribute the load of the transmission so you don’t punch a hole in the pan. BE SURE YOU ARE PUTTING THIS OTHER JACK UNDER THE TRANNY PAN, and not the engine pan. Undo the tranny nuts and bolts, but keep the transmission on the crossmember. Later, you will move the transmission back an inch, so a typical floor jack with casters is a prudent choice over a bottle jack. A transmission jack would be ideal, but who honestly has a tranny jack laying around.
Undo the motor mount bolts and nuts on each side of the block. Do not undo motor mount bolts unless the shop crane and transmission jack are supporting the engine.
Jack up the transmission until it is supported. Remove the driveshaft. Then undo the 6 transmission bolts connecting the block. Push the transmission back (toward the rear) an inch. If it doesn’t separate, then use a pry bar or crowbar. Do not separate your transmission from underneath. Do it from the doghouse, because the engine could easily crush you.
Return to the front of the vehicle and begin jacking up shop crane.
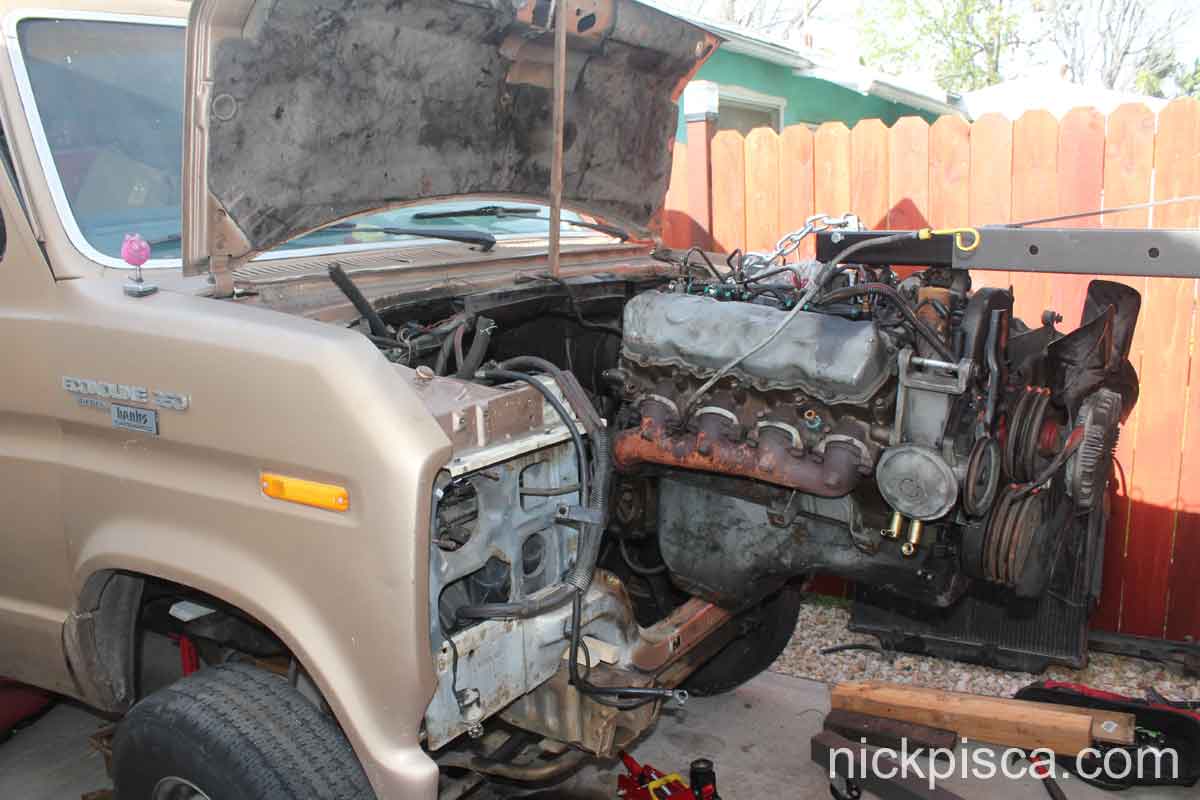
You will need to raise up the engine enough for the four motor mount studs to exit the frame crossmember slots. Be careful. I damaged my valve cover because it was scratching the side of the doghouse opening.
As you raise it up, you will need to keep moving the engine forward. It is a TIGHT fit.
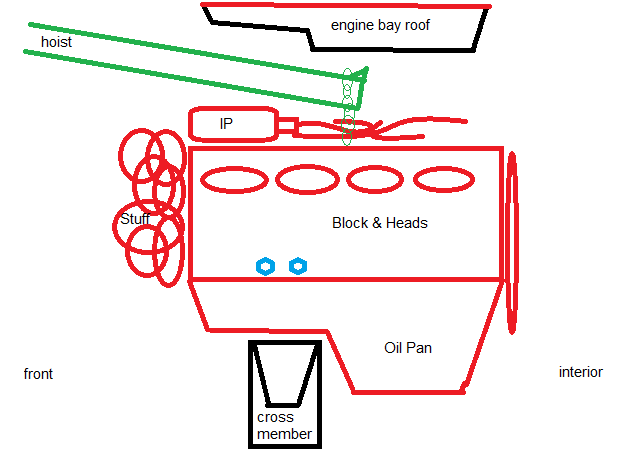
Gradually, it will clear the bottom crossmember, but just barely.

Watch your IP gear housing cover and your IP and injector lines. As you raise the engine up, the shop crane boom will get closer and closer to the top of the engine. I ended up bending my timing advance bracket on my IP by accident using this method, but when I pulled my other 7.3 engine a year later, I remembered this issue and was more careful.
After a lot of sweating, grunting, and screaming, I got the engine pulled out of the bay. I was able to accomplish this all on my own, without an assistant.
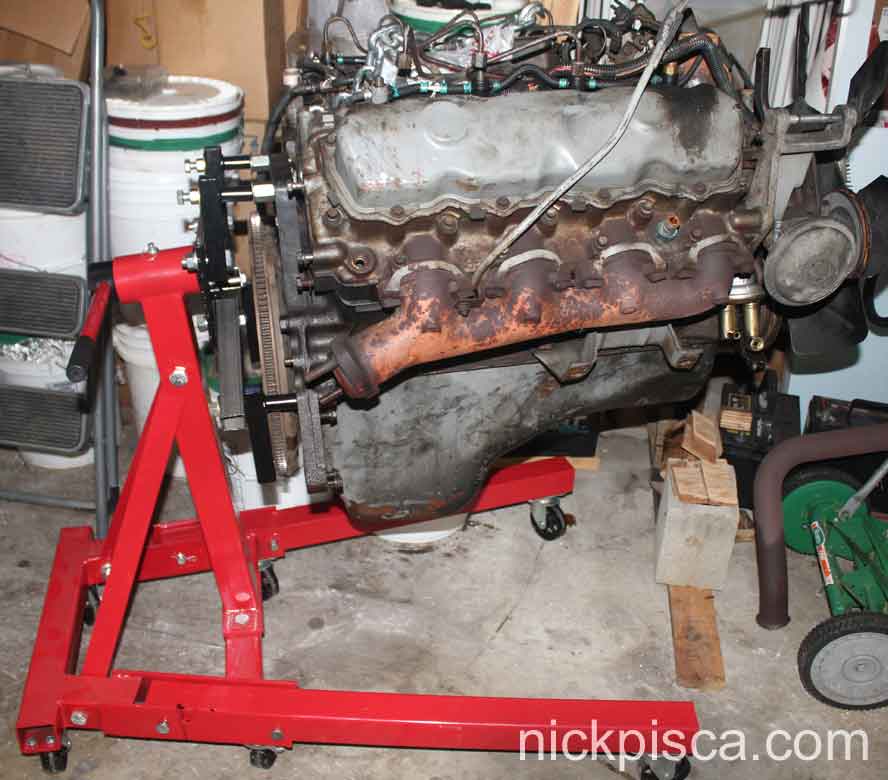
Once out of the vehicle, be sure to find a 2-ton engine stand for your block. A flimsy standard stand will not work. Also, find an engine stand with brackets that are longer than 4 inches. This is hard to find. You need longer brackets because the flywheel is so large. I ended up just buying some scrap steel square tube, and using some high quality Grade 8 steel bolts.
Not responsible for any damage you do to yourself, your vehicle, your tools, or anyone or anything. For informational use only.
