On these old engines, it’s not uncommon to encounter an erratic temperature gauge. Nine times out of ten, this is the result of a faulty thermostat (t-stat). This is probably one of the simplest repair jobs for the average IDI owner, and all it takes is some basic everyday tools and some cleaners to fix.
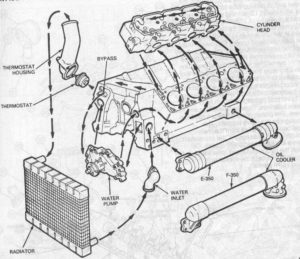
Image Source: The Hyperlogos
The thermostat functions as a gatekeeper for the coolant in an engine. It has a mechanical gate that opens when it reaches a specific temperature, ranging from 190 to 195 def F. Once the engine warms up, the gate opens, and the coolant forms a continuous loop through the radiator, keeping the block at a safe running temperature. The t-stat resides in the “Thermostat Housing” (big surprise there), which sits atop the front of the IDI engine. The top of the housing connects to the “upper radiator hose.” The t-stat is the last stage in a complicated cycle of coolant in the IDI engine.
Since the t-stat housing is located on the top-front of the engine, it is rather easy to extract, even for IDI van owners. Depending on your truck’s accessory and v-belt setup, you might have to remove a vacuum pump or alternator to access it. Be sure to disconnect your battery terminals before working on anything.
For this article, I’ll be showing photos of when I pulled my t-stat on my engine when I had it out of the vehicle. The procedure is the same regardless if the engine is on a stand or in the van, it just might be a lot more cramped. I have replaced my t-stat in my van thrice so it is possible and easy to do, and nothing should be inferred from this article that the engine must be pulled to do this. I just happened to have an engine on the stand, and it was a good time to do the t-stat while I was tearing down the engine.
Preparation:
First thing: Before anything was started, I undid my battery terminals and waited for the engine to be COMPLETELY COLD. Also, while it is not imperative to drain the coolant completely, some coolant needs to be drained to bring the water level down below the t-stat elevation. I drained about a few gallons into a clean bucket.
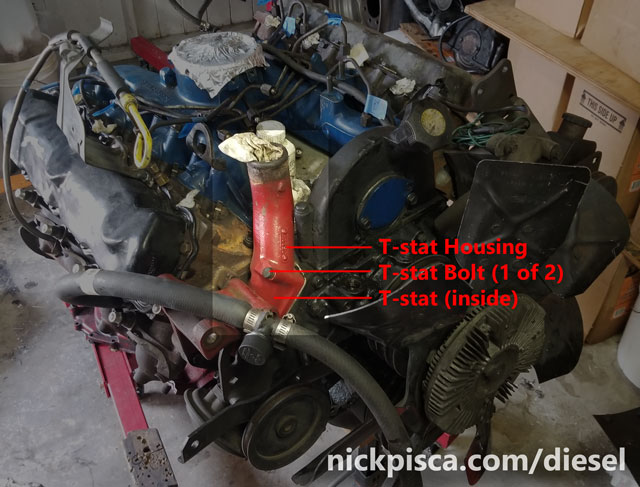
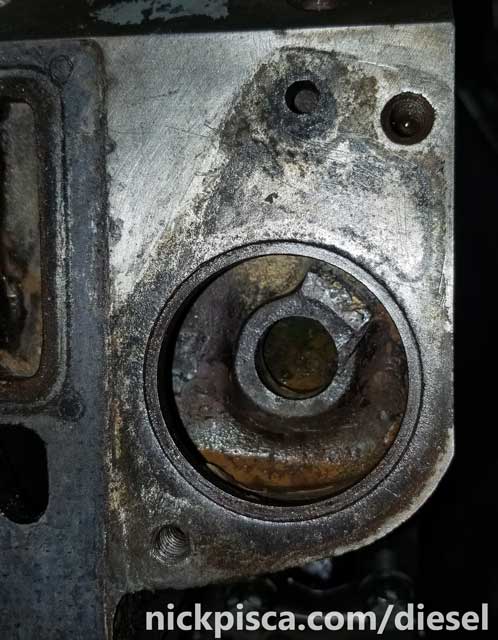
 Depending on your setup, you might have to move a few things. In the case of the 1988 and 1984 E250 and E350, the alternator needs to be removed. Also the vacuum pump+mounting bracket needs to be unbolted from the passenger side cylinder head, but the vac hose and pump adjuster bolts can stay in place. Just weasel it over to the side of the engine bay. With the stuff out of the way, I can now get access to the two t-stat bolts (see image to the right).
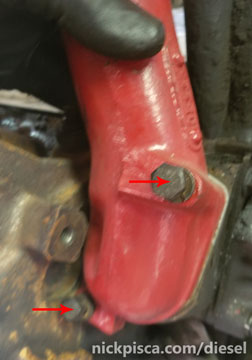
Extract the two bolts and wiggle the housing out of the block. There is a depression on the back side of the housing that allows room for a cylinder head protuberance, so it can take a little weaseling.

In this photo, the t-stat ended up sticking to the housing. Sometimes it sticks to the block. Regardless, pull it out of wherever it is. Ford, according to its Service Manual, has a method for testing a t-stat.
Testing:
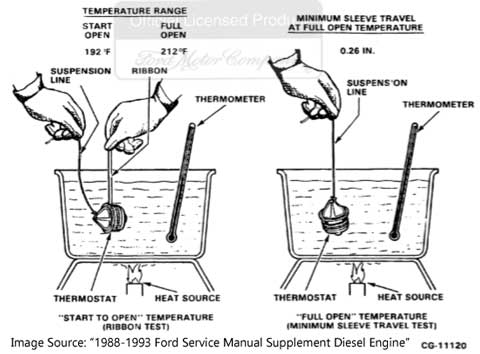
The Service Manual says:
a. Manually open the thermostat enough to insert a nylon ribbon under the valve seat. Suspend the thermostat in the container so the thermostat does not touch the bottom of the container.
b. Heat the container filled with water to the “START-TO-OPEN” temperature of the thermostat (192°F +/-5°). Observe the thermometer and record the temperature as soon as the thermostat drops from the nylon ribbon. THIS READING IS THE “START TO OPEN” TEMPERATURE.
c. Continue to heat water to “FULL-OPEN” temperature of 212°F (100°C). Observe the thermometer and movement of thermostat sleeve. Observe thermostat sleeve movement when “FULL OPEN” temperature is achieved. Minimum sleeve travel at “FULL OPEN” temperature is .26 inches (6.35mm).
To be frank, t-stats are cheap and easy to replace, so the prospect of using a suspect t-stat that might give false-positive or sporadic success in a boiling water test seems silly to me. It is well known by IDI veterans that only Motorcraft t-stats are reliable for these engines, so when sourcing your parts, make sure they are Motorcraft (and not aftermarket) brands. So I won’t be testing my old t-stat even if it passes the boiling water test.
Part Number: “MOTORCRAFT RT1049“
According to Ford (who is a little biased…):
“Caution: Aftermarket “WILL FIT” thermostats may not fully open due to a flat washer secured to the end of the power pill which obstructs the by-pass and normal coolant flow. An additional disadvantage is their omission of the rubber sleeve which provides the positive seal. ONLY GENUINE INTERNATIONAL THERMOSTATS assure the proper coolant flow and positive sealing characteristics required to provide long engine life.”
However, I do always test my new t-stats. Even the Motorcraft brand t-stats can fail straight from the factory, so making sure I’m putting in a good t-stat from the start is important to me. I use the boiling water test shown above, but without all the measuring ribbon and thermometer; basically, if it opens when it boils, then I’m confident it’ll be fine in the block.
Cleaning:
Carefully using a scraper, I removed the old gasket surface. It can take a while to remove the permatex and gasket without damaging the block metal. In the old days, guys would use some hi-grit sandpaper to scuff up the block surface a little to let the gasket compound adhere better. Honestly, with this job being so simple and the t-stat housing being probably the least complicated gasket on the whole IDI engine, I don’t see the harm in scuffing up the block metal a little. But you wouldn’t want to do this on the oil cooler gaskets or head gaskets, that’s for sure.
There is a ball bearing in the upper hole of the block t-stat mating surface. I read about some guys removing that in their IDI’s so that it was easier to flush their engines during a coolant flush, since it takes a decade for these beasts to get up to running temp at idle. You need the engine up to temp for the t-stat to open, and if you are doing a coolant flush (not needed for this t-stat removal tutorial), you need it open for the flush fluid to work its way through the system. I’ve never removed my ball bearings, and I run a coolant tee in the front heater core circuit which allows me to flush the coolant better. Regardless, I’m just passing on the rumor.

Source: Rock Auto
Reinstallation:
Once clean, I sprayed the surfaces with acetone or brake cleaner to ensure zero grime or grease will interfere with the gasket adherence. Also, chasing the threads is always a prudent activity while the housing is apart.
The block has a notch that allows the t-stat to situate flush with the mating surface. The dome part should be facing out of the block, and the black “butt” should be in the block.
I placed the gasket on the block, aligned the bolts in their respective locations, and tightened the housing down. I have used permatex + gasket in the past, and I’ve gone with just a gasket as well. Both held a seal. You’ll need to access the condition of your mating surfaces and see if an additional layer of permatex might be prudent to ensure a solid seal.
Reinstall all the accessories (alternator, vac pump, etc) and reconnect the battery. Refill the coolant and all should be good to go. Check for leaks after running it for a while. Redo anything that you might have fucked up.
No warranty. You are responsible for your vehicle. For novelty use only. Not responsible for anything or anyone. Not responsible for damage to your vehicle, you, or anyone or anything.
Copyright 2000-2018 Nick Pisca 0001D LLC
