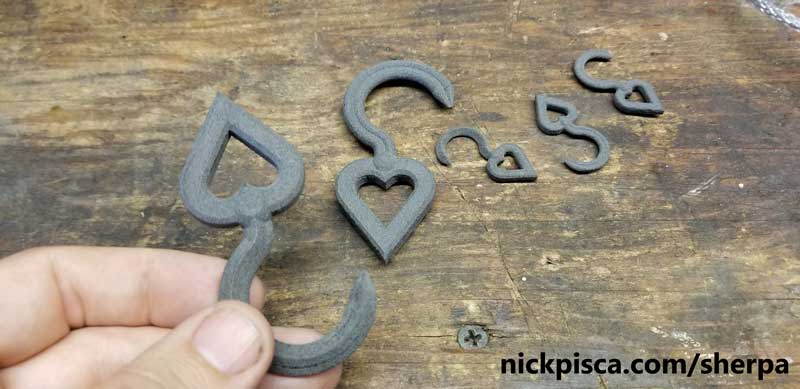
What started as a fun little 3D Printing project for my daughter’s birthday party activities, turned into a test run for using 100% “old” powder without curling or other sintering issues. NICE!
I had been talking with 3D Chimera about how to manipulate the laser offset and hatch patterns to achieve stronger and more durable SLS prints for my company’s inventory, and things were going well. I did have a slight size issue, which led to a few of my prints fusing together and the interconnected parts where too tight to turn easily.
So I took this fun print job as an opportunity to test out variation on the laser hatch and perimeter offset values in the “Custom” section of Sintratec Central.
The good thing is, my modified values have the same perimeter value as the standard Sintratec Central presets, and they were able to sinter 100% old powder without any hint of curling. I ran this test with my usual 173.8 deg surface temp, with a 515 laser speed. But the hatch and outline values were altered, as stated in this video:
Just to reiterate, Sintratec HIGHLY recommends you use a 70%-30% ratio of “new” to “old” powder to ensure proper sintering and structural integrity. Whenever I use this ratio, I experience outstanding sintering success with the kit, and it’s truly great. But after a few dozen prints, you slowly fill a storage bottle with super old powder, that likely has seen the inside of the oven for a bunch of times. It doesn’t sinter well, and it builds up over time.
Don’t get me wrong, I don’t let this old powder go to waste. When I fill up my trays, I use this old powder for the left side tray, and the very bottom 8mm of the right tray. Then I use good powder on top of that low layer on the right side. The kit is designed to sinter plastic on a bed of powder, so that first pile of powder on the left side isn’t going to see the light of day. When the machine is “preparing powder,” that is just sliding over 26 layers of right-side powder on top of the already 5-9mm of powder that was there when I filled the left side tray. So why not use that old powder… it’s just there to support the first sintered layer, which could be as much as 15mm from the left tray.
The innovation of this “fun” print was, I used 100% “old” powder in conjunction with modified laser hatch and perimeter settings to make it sinter properly.
This is a huge advancement. Whenever I want to do quick and dirty prototyping, I’ll use these values in the future to save some money on the PA12 supply. Kewl!


Hello, my name is Albert Aparisi. I recently started working with a Sintratec Kit at my university, TU Berlin. I don’t have much experience with SLS 3D printing technologies and I find your videos and post really useful.
I wanted to ask you about the parameters of the laser for using 100% old powder. At the university I have limited resources and I might need to explore this option too.
Besides, I wanted to ask you about what chamber temperature are you using? I am suffering from some warping.
Best Regards,
Albert
Hi Albert,
IIRC, I think our chamber temp is 140° C. I don’t know off the top of my head, and I can’t fire up the machine at the moment (doing some mods). As for laser settings, the values I mentioned in the video are typically what I use, however, that’s not a 100% guarantee it will work. A lot of factors change the laser modifications, notably, the largest surface area that could potentially be sintered on a particular level. A laser hatch that is too small could result in too much time elapsing on that level, and the perimeter could curl up before the hatch completely finishes on that layer. Also, there are other issues too. Like each Kit is slightly different, so regional temperatures can result in slight modifications to the laser settings and surface temps. I’ve recently added another layer of aluminum insulation to the hinge-side of the door, to try and limit the oven heat leakage on the front left side of my bed, which inadvertently altered all my previous laser and temp settings. I plan to add another layer of insulation, in the hopes that leakage will be even less, and then I’ll run another calibration grid to verify my alterations have provided a benefit.