1998 VW Jetta
TDI VO Conversion Installation Thread Return to Main Page
Dual
Tank System < 1 2 3 4 5 >
WVO & SVO Compatible
Design and
Installation: Nick Pisca, July 2007
COMPONENTS TOOLS
2 twenty-plate heat exchangers Safety
Glasses
1 filter head (fits B2-HPG
Baldwin filter, or compatible) 3/8”
Drive Socket Set (Metric and Standard)
1 custom
under-mount aluminum tank (10.5 gallon capacity) Phillips + Standard Screwdrivers
2 hydraforce fuel switch-over valves Power Drill
1 17-19 inch HotFox fuel pick-up Drill Bit
Set
1 4-7 psi
fuel pump 2½
- 3” Hole Saw
75 ft 3/8” dia
fuel hose Brake
line Pipe-Bender
10 ft 3/8” dia
high pressure fuel hose 200+
Grit Sandpaper
20 ft 5/8” dia
coolant hosing Reciprocating
Saw or Hacksaw
2 12V/30A switches Soldering Kit
4 30A fuse holders Vice-Grips,
Pliers, Channel-Locks
various amperage fuses Wire
Cutters
1 temperature gauge Utility
Scissors
25 ft 14 gauge wire 2-ton
Hydraulic Jack
10 ft 10 gauge wire Jack
Stands
1 spool 14-16 gauge aluminum uninsulated wire Automotive
Manual and/or Service Guide
box butt splices, assorted
electrical connectors
box 7/16” head bolts w/ nuts
box 1/4” washers
1 roll reflectix insulation
100 pack zip ties
several brass fittings 5/8” and 3/8”
many hose clamps
NOTE: Research Before
Converting Your Car!
I’ll assume that you’ve
already done your homework on the differences between WVO, SVO, Biodiesel and so on. If not, you probably shouldn’t be following this
thread. Some of the basics are…
WVO =
Waste Vegetable Oil
SVO =
Straight Vegetable Oil
Biodiesel = Vegetable Oil with additives
Rules:
Your car
must have a Diesel engine.
Don’t
pour untreated Vegetable Oil into your Diesel Tank.
If you didn’t know those
things already, visit the many forums
and websites
devoted to VO conversion.
Prior to Installation:
I spent
a good deal of time under the Jetta before the
conversion looking to for extra spaces.
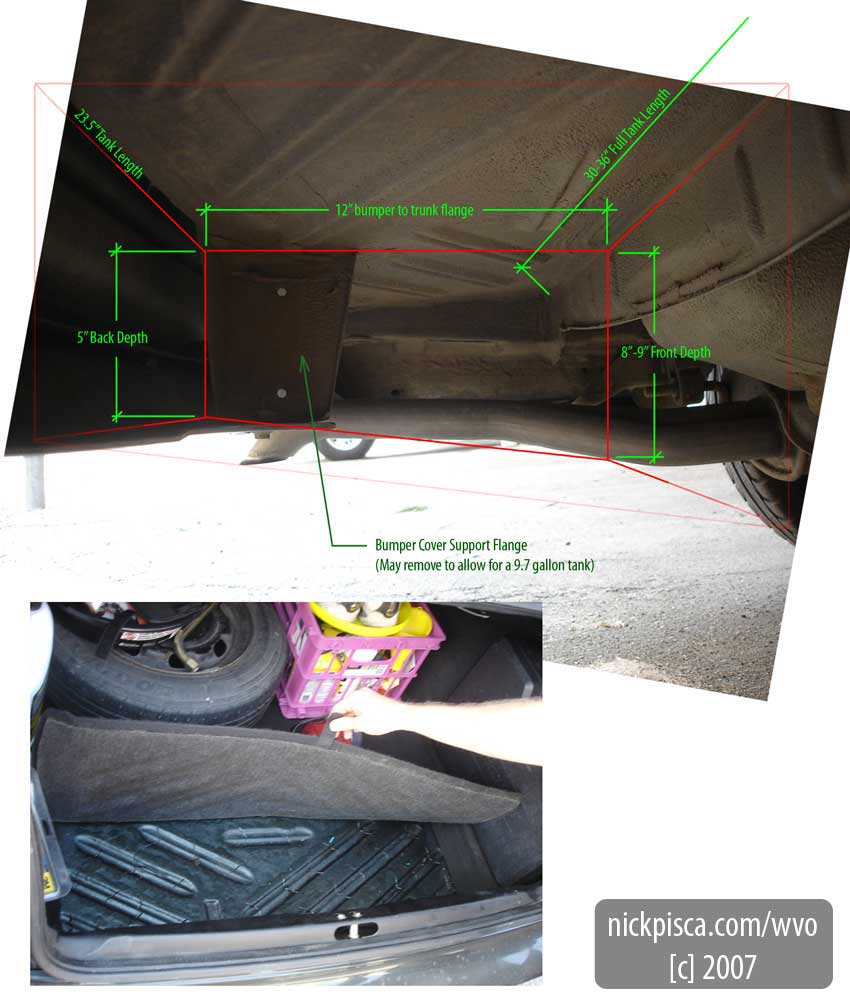
Since the VW is rather small, I wanted to maximize my trunk space by
mounting the secondary veggie tank underneath.
Luckily, there is a large open rectangular compartment directly under
the trunk. After some quick
measurements, I speculated that a 12” x 23” x 5” volume could work
unobstructed, and a 12” x 32” x 5” tank would work, but require some
demolition.
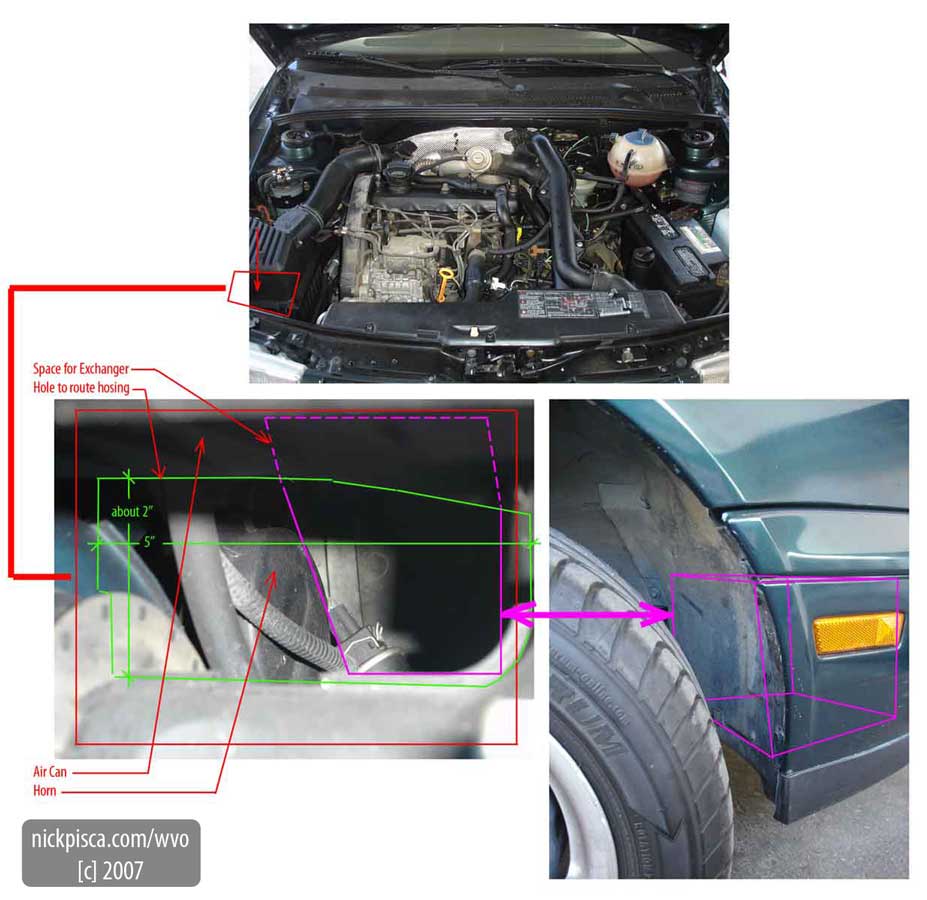
Also, I
found some space in the front clip to store the 20-plate Heat Exchanger. I wanted to avoid storing this in the engine
compartment, just in case I needed to perform repairs. This component could be in the way.
Near the
air conditioning unit, there is a void surrounded by plastic. I didn’t have the heat exchanger yet and hadn’t
seen a picture of it, but I suspected that its size would be smaller than the
designed space.
After
massive preparation, I laid out a strategy to convert the Jetta. This design
was the initial plan and did change a little.
Glenn
suggested that I move the filter head after the pump, for if the filter
clogged, I could burn out my pump. And
since I was using a cheapie fuel pump, it will be weak and susceptible to
damage. Also, we had a back and forth
discussion about whether to have a series or parallel circuit spliced into the
heater core. Glenn made a parallel
system in his Benz and continued this on his Passat,
which was under construction coeval mine.
He set up manual valves so he can shut off portions of the coolant
circuit if necessary. I stuck with a
series circuit because Jeff
tried the same thing on
his Jetta.
Components – Purchasing
and Accumulation
I wanted
to make the conversion myself and avoid buying a kit from Frybrid,
Golden Systems or PlantDrive. This required finding all the components on
my own. Since Glenn was building his Passat too, we tried to buy elements in bulk to save
money.
(2) Hotfoxes – I found a
ebay store selling 17-19 inch Arctic Fox Hotfox units for 175 dollars. I offered 300 for two and he accepted
it. This was a good deal considering
buying them new is over two-hundred a piece.
(6) 20-Plate Heat Exchangers – Glenn found a Canadian dealer selling nickel-plated
exchangers for a reduced rate. We
purchased six, but they arrived rather late (due to international
shipping). We split them three each,
with the anticipation of using two per car.
Glenn later installed all three and has been maintaining solid temp.
Unit Key:
A:
17-19 inch HotFox $150
B: 4-7
PSI Fuel Pump $39.99
C:
100-pack Zip Ties $3.99
D: (2)
20-plate Nickel-plated Heat Exchangers $89.90
ea.
E:
Filter Head $110.00
F: (2)
Hydraforce Selector Valves with gasket fittings $99.90
ea.
G: (2)
30A Automotive Switches $5.99
ea.
H: Various
Brass Fittings
I:
Teflon Tape $1.99
J: 20
feet 5/8” Heater
Hose $13.21
K: 50
feet 3/8” Fuel
Hose $45.98
L: 25
feet 5/32” Vacuum
Line $17.80
M: Custom Aluminum tank $365.00
Unmarked: Injector Line Heaters (not
used in Jetta conversion) $48.00
Totals $1187.54

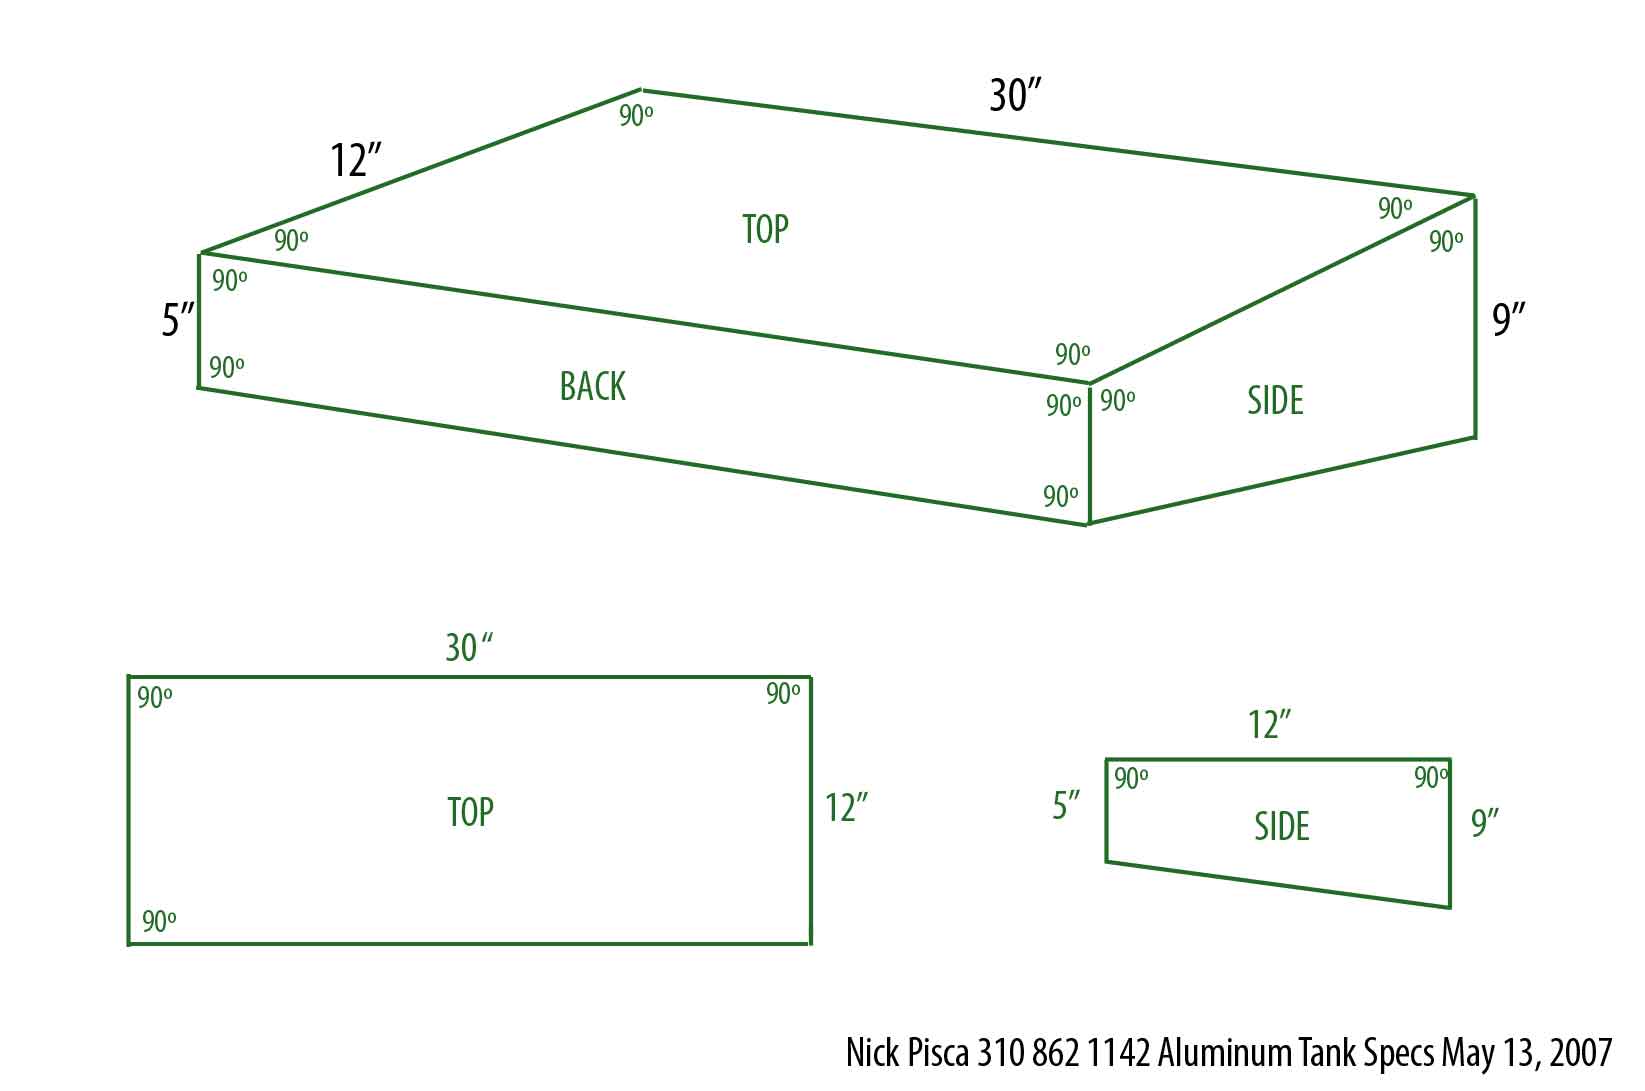
TANK:
The tank design is rather
unique and provides the maximum efficiency of unused space in the 1998 Jetta. I wanted my
conversion to be very clean and have minimal impact on my engine and trunk
compartments. Once I made a basic design, I got
quotes from various SoCal metal fabricators, ranging from
$600 to $1200 dollars. Most of these
manufacturers deal with high-end hot-rod tanks or industrial-size
components. Luckily, Royal Manufacturing
of Santa Ana stated “no project was too small” and quoted my first design at
$250. I was going to leave it at that
and install a threaded type HotFox mount to secure the VO pick-up. Arctic Fox recommends using the A-1721 or
A-2060 horizontal adapters, which run over two-hundred dollars.
I revised the design and
detailed it to have breathers, returns and other elements, and most
importantly, I created my own horizontal adapter based on the A-2060 specs
directly from Arctic Fox. Royal built
the tank in twelve days as I waited for delivery of my HotFox, so I was never sure
if the dimensions to which I designed the tank were actually going to
work. But they fit seamlessly. The new “ear flange,” as the engineer at
Royal called it, cost an extra 100 dollars.
[c] 2007
Nick Pisca . www.nickpisca.com/wvo
. Waste Vegetable Oil Awareness and Travel . www.nickpisca.com