1998 VW Jetta
TDI VO Conversion Installation Thread Return to Main Page
Dual
Tank System < 1 2 3 4 5 >
WVO & SVO Compatible
Design and
Installation: Nick Pisca, July 2007
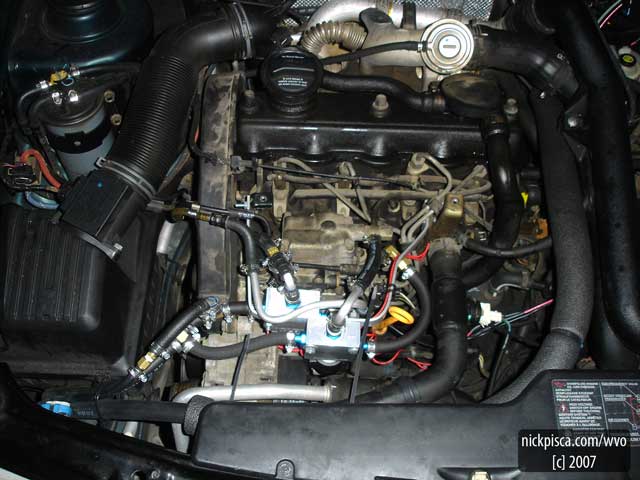
Engine Compartment Modifications
The
front of the car has a hidden heat exchanger, two selector valves and some fuse
housings.
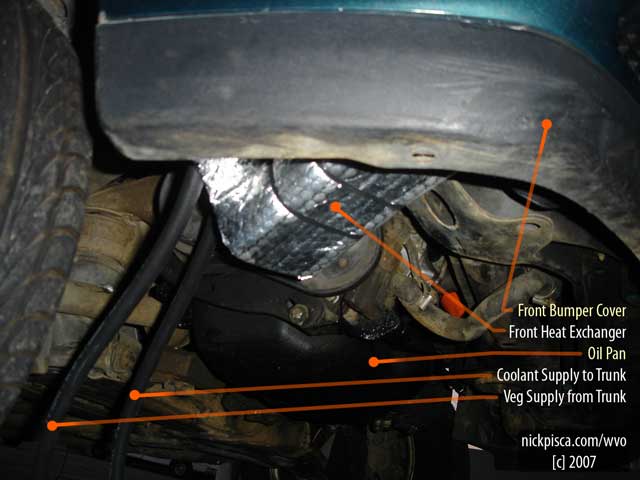
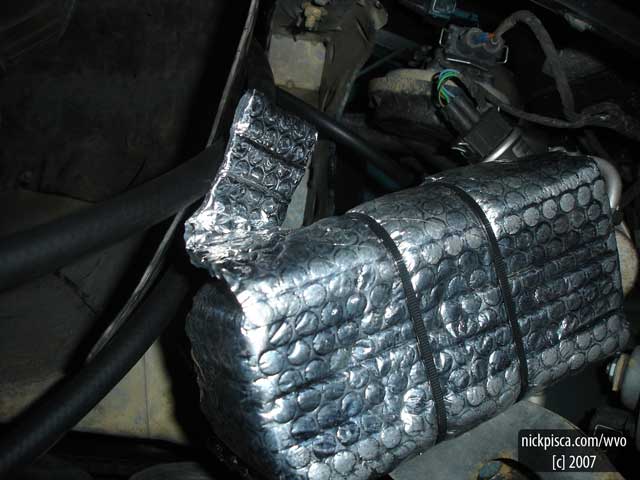
HEAT EXCHANGER LOCATION:
In the
planning for the conversion, I found this little space in the front clip
directly underneath the air filter canister. It looked quite big, but once I obtained the
heat exchanger, it appeared to be tiny. I was able to manage it into place, but it forced
some pressure on the outlet hoses. After
some miles, I started leaking some G12 with every stop. I pulled it out later that week and tightened
down the clamps and fittings. I have
plenty of Teflon tape on the FPHE and they are tight, but I’m suspicious that
the unit has a fracture.

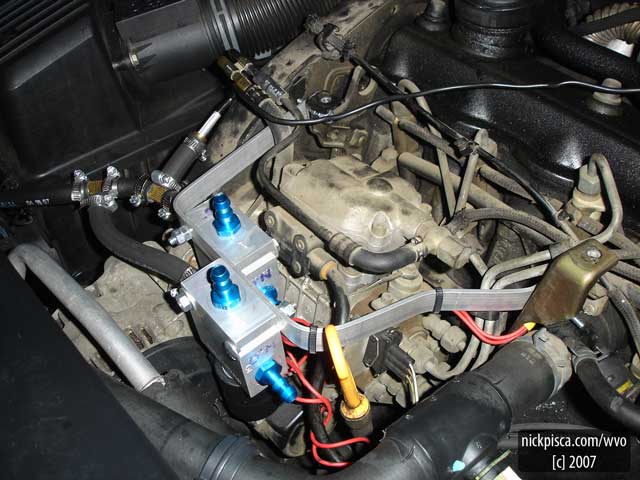
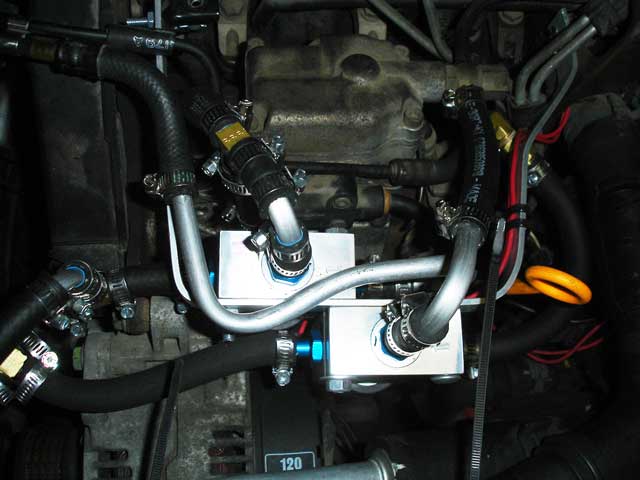
BEGINNING STEPS FOR VALVE INSTALLATION:
First
thing, I wanted my valves to have a secure armature so they are stabile. By bending an 1/8” x 3/4”
x 24” thick aluminum strip into a choppy “C” shape, I was able to cantilever
this off of the two brackets meant to support the plastic VW TDI cover. If I wanted, I could still reinstall the VW
TDI cover, but I’ve left it off until I’m sure the system is completely
bug-free. The C-armature has a jog on
the driver’s side to still allow access to the motor oil dipstick.
Three
thru-bolts held down the Hydraforce heat exchangers
just above and right of the alternator. They are out of the way and still need only a
four inch length of fuel hose to reach the IP supply and return nubs. We got a deal online for the valves, but that
meant our blue fittings didn’t have a 90 degree bend. Annoyingly, they shot out like a starfish and
robbed the compartment of room. I needed
to save space without the possibility of hose kinking or having a blobby mess
like in the back of the car. (You’ve
probably noticed that I’m abnormally suspicious of “kinking.” I mention this because on our first trip
across the country on VO, we had a number of rubber hoses kink shut after some
use. This was problematic, because when
Glenn built the car, I’m sure that the hoses initially bent smoothly. So those kinks occurred down the road, and
when you’re 3000 miles away from home, it’s troublesome.)
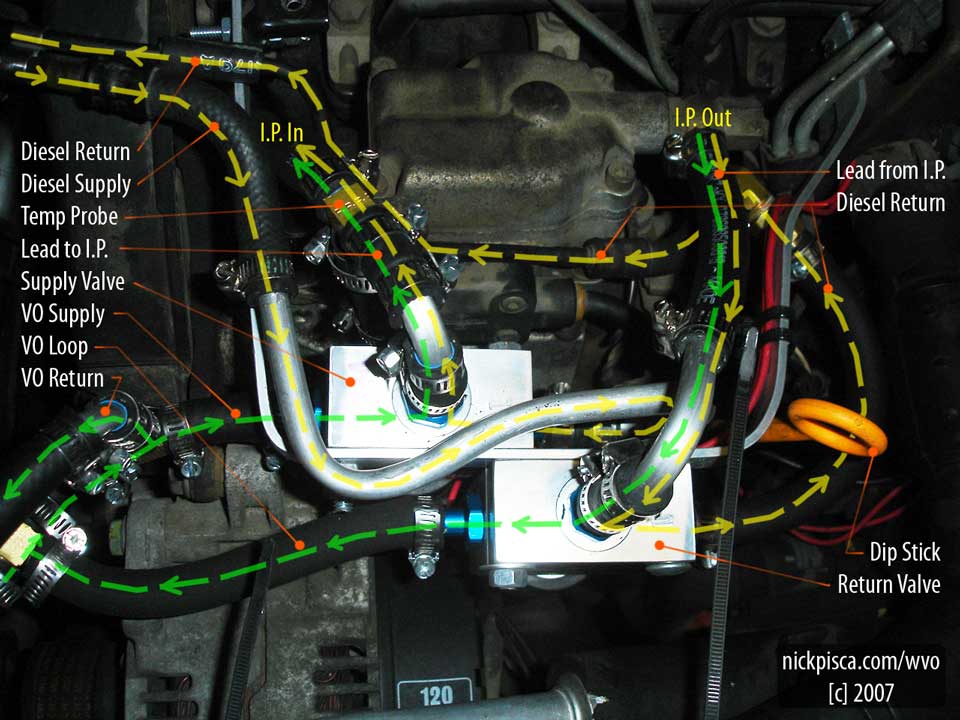
On the
upper-left of the image, you’ll see the VO supply line which splices off to
both selector valves. These are the
default-ON position for each valve and if power fails or they go bad, the
valves will fall back onto default-OFF corresponding to diesel. The valve closest to the IP is the supply
valve and the other is the return. I
have the limited return reconnect back into the supply line so I’m always recirculating my heated veg and no
losing heat back to the tank. You’ll
also notice that I have my temp sensor just before the supply valve. Later, I moved this to the IP supply feed, so I
can measure temp of the diesel and VO. The
existing brass tee was relegated to manage the VO return, connected to the
bundled 5/32” vacuum tube. I pinched off
the fitting to resist the pressure of my pump, but when you go back to the
tank, there is still a good deal of liquid moving through my vac hose.
Lastly,
the only downside to this layout was the diesel fittings for each valves emerge
180 degrees from the diesel filter.
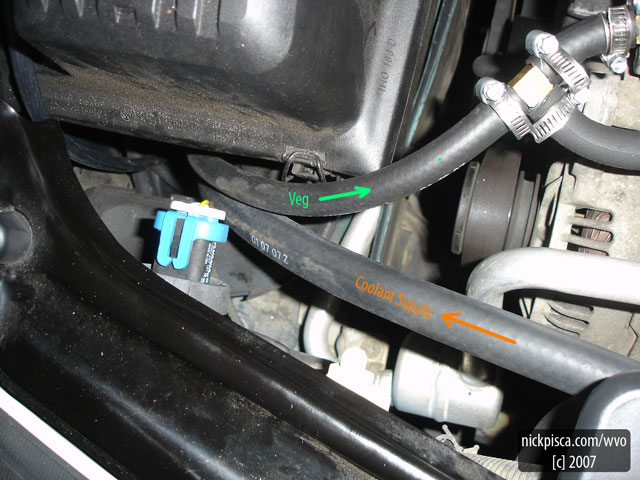
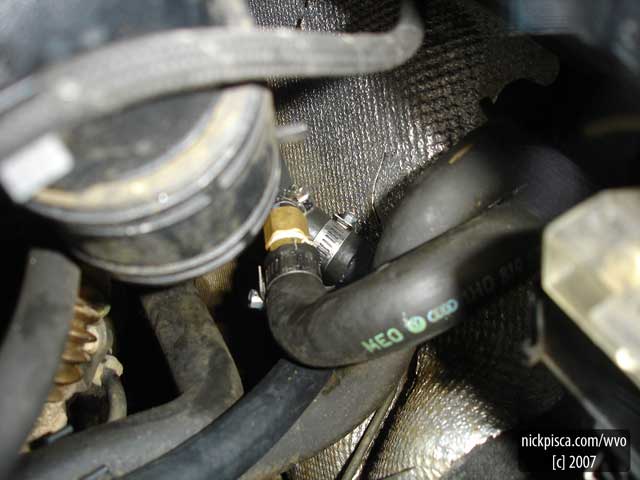
COOLANT SPLICE:
I
realize this is a horrible image, but the center hose is half of the old heater
core hose. Since the coolant return came
up along the firewall and the coolant supply line wrapped around the engine, it
was easier to cut the existing heater core hose in half and use brass reducers
to match up directionality of flow. You’ll
notice that the darkest hose (center, below) is the coolant supply hose at 5/8”
diameter. It’s connected using a 5/8” 90
degree plastic heater hose bend from Kragen, to the
right of the brass fitting in the middle.
THE COMPLETED CONVERSION:
I was too
excited to wait and try a diesel (with diesel service) test run on my second
tank. After vacuum pumping out all the air
in my diesel system, I fired up the engine with some trouble. I thought I had a leak in the diesel hose, for
I reused my old feed lines from the diesel filter, and they were pretty
cracked. To check if this was the
problem, I cut a direct segment from the filter to the valve. Still, if I let the engine sit, the IP would
lose its prime and take some cranking to start. I forgot to mention that I had to buy a new
battery from Kragen, because I let my car sit for
four weeks without running. The darn
thing wouldn’t take a charge and it was already pretty old.
Still, I
had a leak somewhere in the diesel system that depressurized my fuel lines. Once I pumped the system full of SVO, it
filled against the other side of the supply valve and it never lost its prime
again. I think the valve may be water-tight
but not air-tight, and since there is fuel at both ends, it will hold for now.
CLOSE-UP OF THE FRONT SYSTEM:
The #1
trick for a VO road trip: Bring BabyWipes.
The #1
trick for VO conversions: A brake-line
pipe bender.
You can really
make some clean and complex bends with some cheap metal aluminum pipe and a
simple bender. Notably, the center
aluminum pipe was designed to bend up and between the valves, jut down toward
the engine and cut back to match up with the valve fitting. It’s almost if you had an “S” shaped pipe and twisted
the top away from the bottom. Also the
pipe bender let me make cheap 90 or 90+ degree bends without kinks. Sometimes the brass bend fittings would cost
over 4 or 5 dollars. Making your own
with a bender will cost a few cents.
[c] 2007 Nick Pisca . www.nickpisca.com/wvo . Waste Vegetable Oil Awareness and
Travel . www.nickpisca.com